Homemade Pork Buns!
Dear Pork,
We meet again. This time things got intense. As per usual I was dabbling in vegetarianism, reading books like “Animal Factory” and “Eating Animals” and having thoughts like “I just can’t keep eating meat”. Then I bought a groupon for Barnes and Noble. Dammit, I blame it on them. I was perusing the shelves, looking for just the right present to myself (I’ve imposed a cookbook moratorium on myself so this was a big day). Then I saw it. A book I’ve been dreaming about since I read about it online: “Asian Dumplings” by Andrea Nguyen. My Lord, it’s like she wrote a book just for me. I snatched it up and stayed awake that night reading it cover to cover. But I’ve been so busy with my new business that I just didn’t have time to make anything from it for months! But finally, I got a day off. And what did I do? I made pork buns. Sticky, messy, slightly sweet, cracktastic pork buns.
First I marinated you in a magical sauce with all kinds of delicousness: five spice powder, hoisin sauce, honey, soy sauce and much more.

Then I laid you on a rack to go in the oven.

And roasted you until you were all glossy and charred and happy looking.

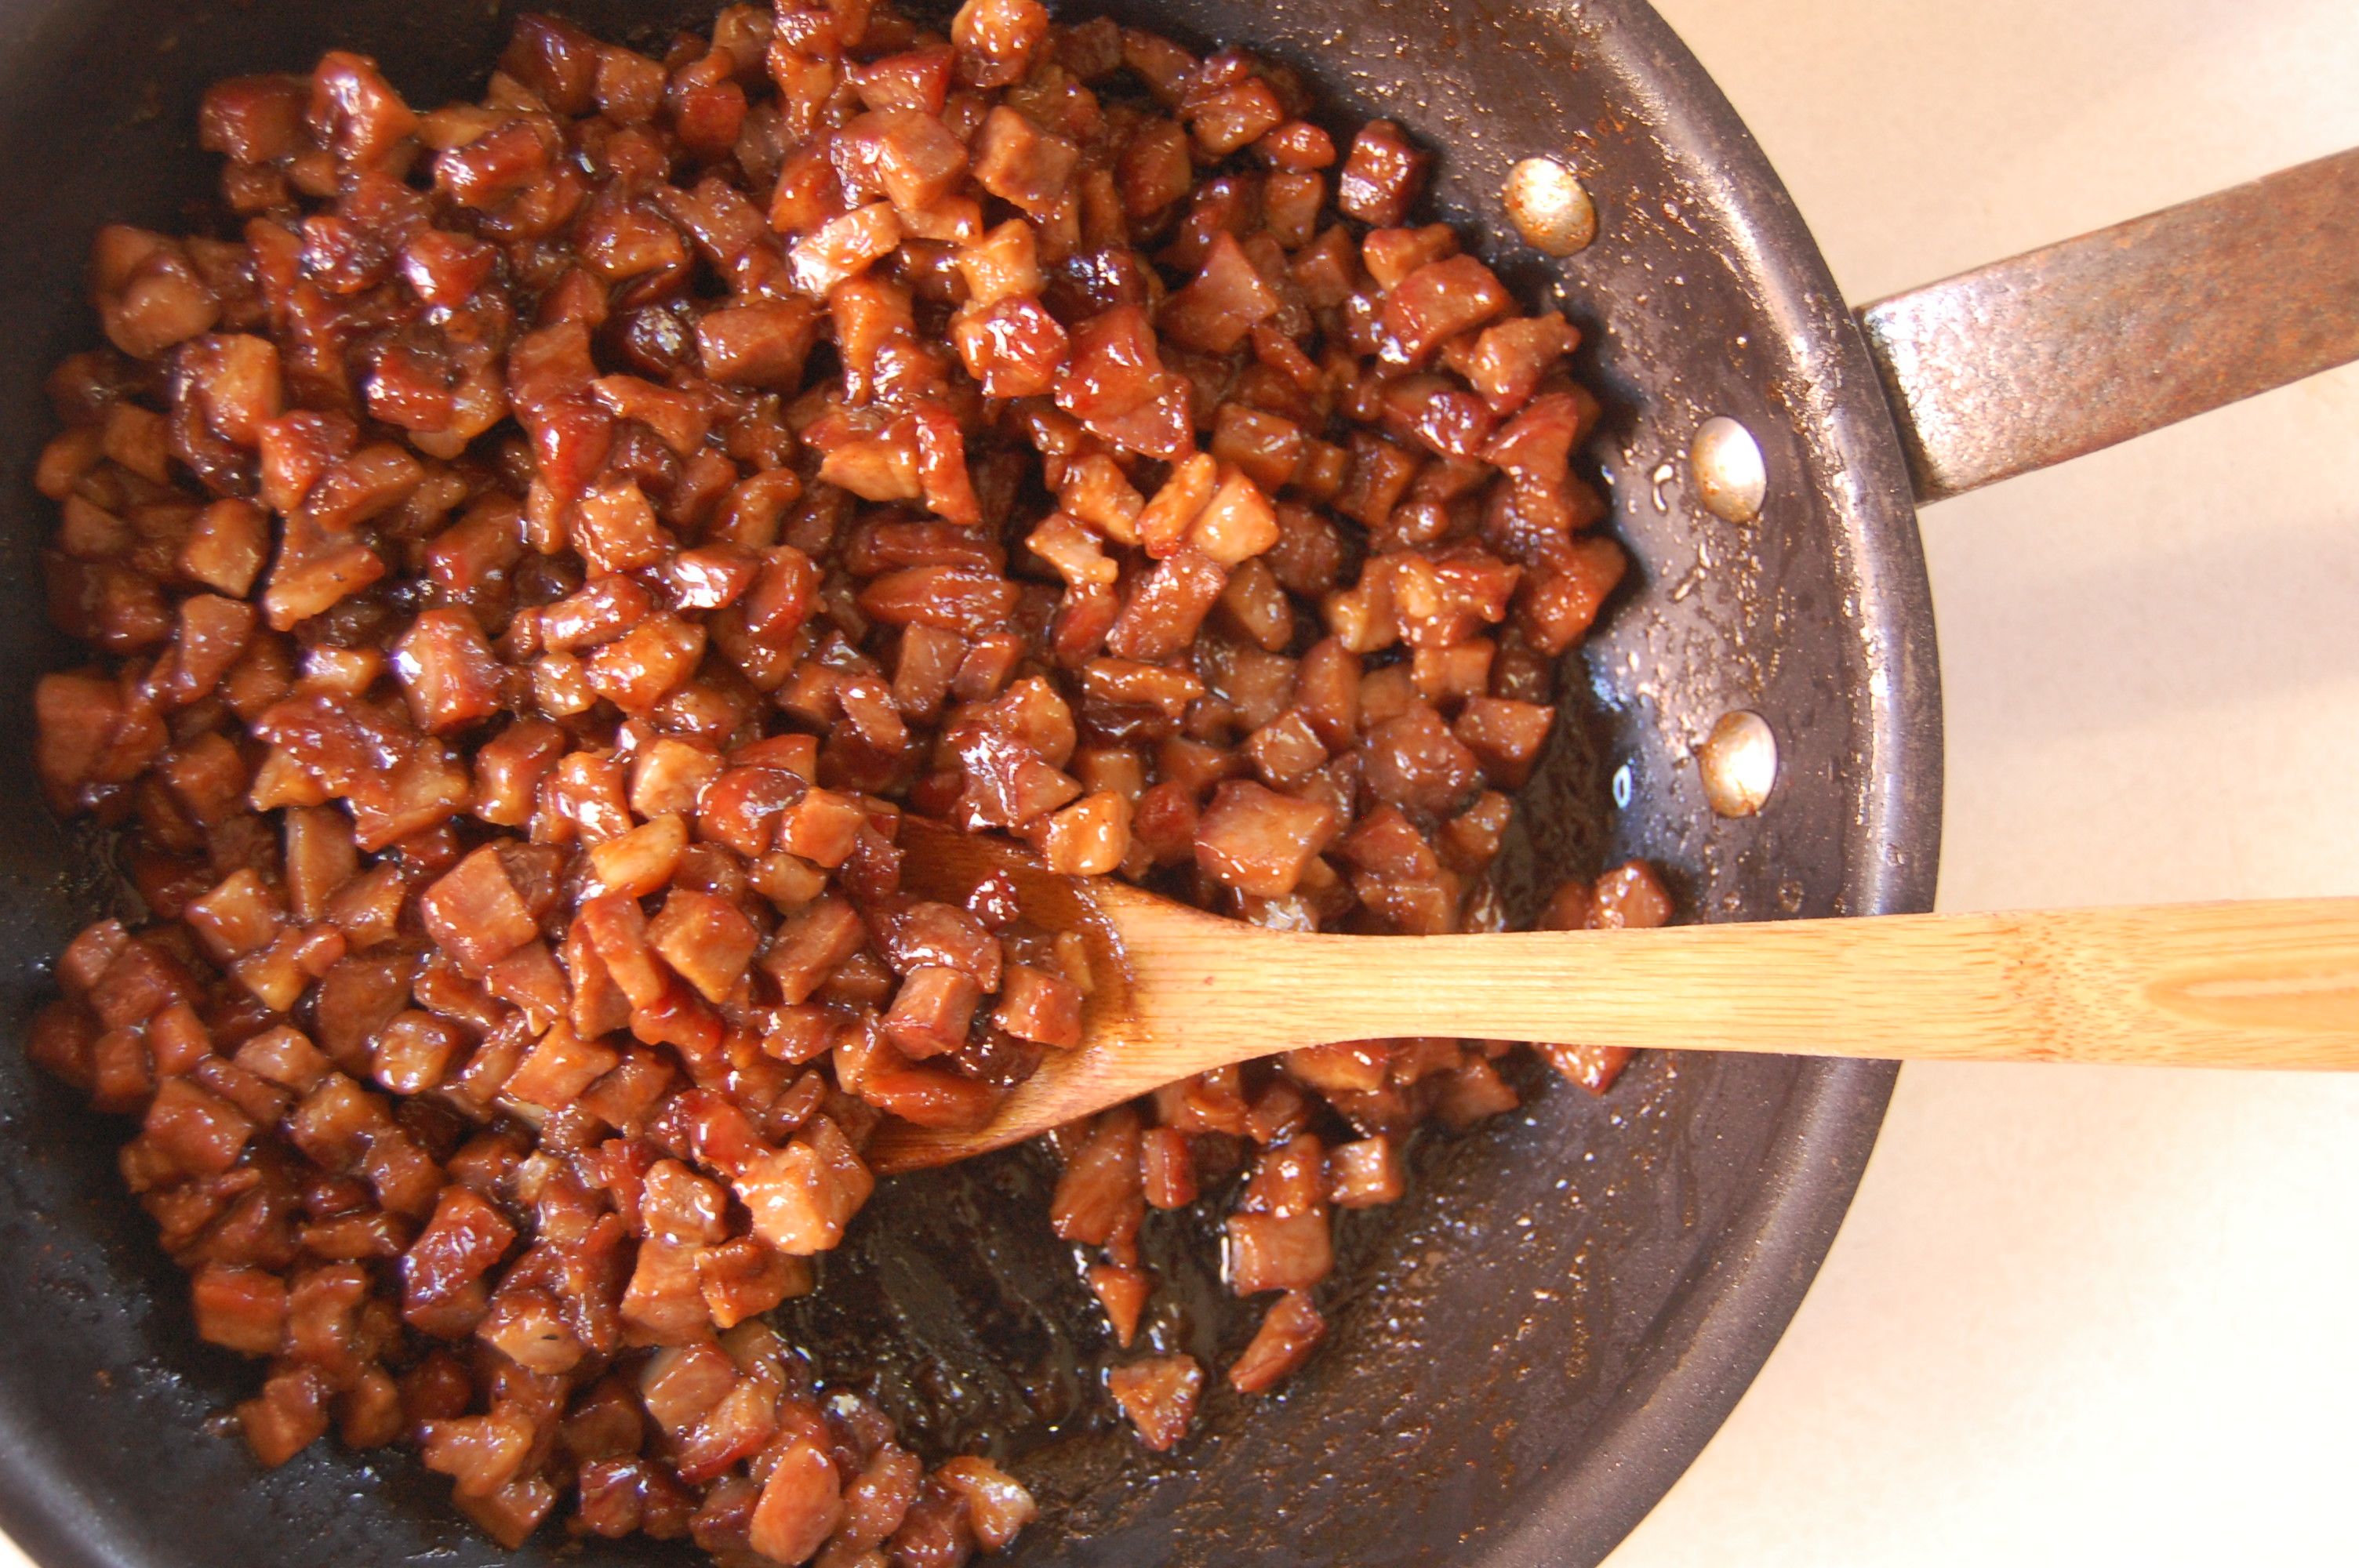
From there I took it a step further. I chopped you up into itty pieces and cooked you with more delicious sauciness.

While you waited patiently, I made a dough, a dough not too different from my favorite hamburger bun dough. I cut that dough into chunks.

And then I encased you in that dough, giggling with every pleat.

You made adorable dumplings.

I let your dough rise until soft, and then I roasted you again. I pulled you from the oven and glazed you with honey. And then me and friends devoured you. Oh my, sweet pork, you do continue to surprise me. Thank you, for setting me straight again.

PORK BUNS RECIPE (Andrea Nguyen):
Char Siu Pork:
1 lb bonelss pork shoulder
1 big clove garlic
1 1/2 TBSP sugar
1/4 + 1/8 tsp five spice powder
2 TBSP 3/4 tsp hoisin sauce
1 1/2 TBSP honey
1 TBSP + 1/2 tsp Shaoxing rice wine
2 1/2 TBSP soy sauce
1 1/2 tsp sesame oil
– Cut the pork into strips that are 1 1/2” thick.
– Mix the rest of the ingredients in a bowl large enough to fit the pork, this will be the marinade. Remove 1/3 of the marinade to a small bowl and store in the fridge. This will be used later on for basting the pork as it roasts. Toss the pork in with the rest of the marinade to coat evenly. Cover and refrigerate for 6-8 hours, turning the pork 2-3 times.
– Remove the pork and reerved marinade from the fridge and let sit at room temperature for 45 minutes. Preheat the oven to 475 degrees. Line a baking sheet with aluminum foil and place a roasting tack on top. Put the prok on the rack, leaving an inch between the pieces for heat circulation. Discard the used marinade.
– Roast for 30 minutes, basting both sides of the pork with the marinade every 10 minutes. Flip the pieces over at every interval. T]he pork is done when it is glazed and slightly charred, Remove from the oven. Let the meat rest for 10 minutes before using.
Pork Bun Filling:
1 TBSP sugar
1 pinch of salt
1 pinch of white pepper
1 TBSP soy sauce
2 tsp oyster sauce
1 TBSP water
2 tsp canola oil
2 scallions (white and green parts), chopped
1/2 pound Char Siu Pork, diced
1 tablespoon Shaoxing rice wine
1 1/2 TBSP cornstarch dissolved in
2 TBSP water
– To make the flavoring sauce, combine the sugar, salt, white pepper, soy sauce, oyster sauce, and water in a small bowl. Stir to dissolve the sugar and set aside.
– Heat the oil in a medium skillet over medium heat. Add the scallions, and cook, stirring constantly, for about 30 seconds, or until aromatic and slightly softened. Add the pork and combine well. Add the flavoring sauce and cook, stirring frequently, for about 2 minutes, or until the pork is heated through. Meanwhile, add the rice wine to the dissolved cornstarch. When the pork is hot enough, add the wine and cornstarch mixture. Cook for another 30 seconds, stirring constantly, until the mixture comes together into a mass that you can mound. Transfer to a bowl and set aside to cool completely before using. (The filling can be prepared up to 2 days in advance, covered with plastic wrap, and refrigerated. Return to room temperature before using.)
Dough:
10 TBSP whole milk
4 TBSP butter
2 tsp rapid-rise (instant) dry yeast
2 1/2 TBSP lukewarm water
1 large egg
2 1/2 TBSP sugar
12 1/2 oz All-purpose flour
1 large egg, lightly beaten
2 TBSP honey mixed with 1 TBSP warm water
– For the dough, melt the butter with the milk in a saucepan over medium heat. Set aside to cool for about 5 minutes, or until warm (about 110°F).
– Put the yeast in small bowl, add the water, and set aside for 1 minute to soften. Whisk in the milk mixture and the egg to blend.
– Combine the sugar and flour in a food processor. Pulse two or three times to blend. With the machine running, pour the yeast mixture through the feed tube in a steady stream. After a sticky mass of very soft dough forms, about 5 seconds, continue processing for 45 to 60 seconds to form a smooth, slightly sticky dough that mostly cleans the bowl. The finished dough should stick a bit to your finger when pressed. Alternatively, to make the dough by hand, combine the sugar and flour in a large bowl. Make a well in the center and pour in the yeast mixture. Slowly stir with a wooden spoon to work in all the flour. (Add water by the teaspoon if this doesn’t happen with relative ease.) Keep stirring as a ragged, soft mass forms. Then use your fingers to gather and pat the dough into a ball. Transfer to a work surface and knead for about 5 minutes, or until smooth, fingertip soft, and slightly elastic. (You should not need any additional flour on the work surface if the dough was properly made. Keep kneading and after the first minute or two, the dough should not stick to your fingers. If it does, work in a sprinkling of flour.) Press your finger into the dough; it should spring back, with a faint indentation remaining.
– Regardless of the mixing method, lightly oil a clean bowl and add the dough. Cover with plastic wrap and put in a warm, draft-free place (for example, the oven with the light on) to rise for about 45 minutes, or until nearly doubled.
– Line 2 baking sheets with parchment paper before beginning to assemble the buns.
– Remove the dough from the bowl and put on a lightly floured surface. Knead it a few times, then cut it in half. Cover one-half with plastic wrap or an inverted bowl to prevent drying. Roll out the dough into a 12-inch log, and then cut it into 8 or 16 pieces for medium or small buns, respectively. (Halve or quarter the log first to make it easier to cut even-size pieces. The tapered end pieces should be cut a little longer than the rest.) Lightly roll each piece between your hands into a ball and then flatten each one into a 1/4-inch-thick disk. Use a wooden dowel-style rolling pin to roll the pieces into circles, about 2 1/2 inches in diameter for small or 31/4 inches in diameter for medium buns. The rim should be thinner than the center; keep a 1-inch-wide belly. The finished circle will rise as it sits. Lay the finished circles out on your work surface, lightly dusting their bottoms with flour if you fear they will stick.
– To form a bun, hold a dough circle in a slightly cupped hand. Use a spoon or fork to center about 2 teaspoons of filling for small buns, or about 4 teaspoons of filling for medium ones, on the dough circle, pressing down very gently and keeping about 1/2 to 3/4 inch of the dough clear on all sides; your hand will automatically close slightly. Use the thumb of the hand cradling the bun to push down the filling while the other hand pulls up the dough edge and pleats and pinches the rim together to form a closed satchel. Pinch and twist the dough closed at the end. Place the bun pleat side down on the prepared baking sheet. Repeat with the remaining dough circles, spacing them 11/2 inches apart on the baking sheet. Loosely cover with plastic wrap or a kitchen towel. Set in a warm, draft- free place (for example, the oven with the light on) for 30 minutes to rise. Meanwhile, work on the other dough half to form more buns.
– To bake the buns, about 10 minutes before the rising time is over, position a rack in the middle of the oven and preheat to 350°F. (Let the buns finish rising at room temperature if you’ve had them in the oven.)
– Bake one baking sheet at a time, brushing the top and side of each bun with the egg right before baking. Bake small buns for about 14 minutes and medium buns for about 18 minutes, or until a rich golden brown; the cooked buns sound hollow when tapped on the bottom. Remove them from the oven, set on a rack, and let cool for 5 minutes.
– Brush the honey mixture on the buns for a sweet-glaze finish that will also soften the crust. Enjoy warm and out of hand. Refrigerate left- over buns for up to a week and reheat at 350°F for 8 to 10 minutes, until hot. When making the buns in advance, wait to brush on the glaze until after you’ve reheated the buns. These buns may also be frozen for up to a month. Thaw them completely before reheating.
Piggy’s Got a New Blanket
Okay, time to own up to another guilty pleasure.
You might remember a certain love letter, to a certain carnitas, written many a month ago. Well, it is carnitas time again. I mean, when is it ever not carnitas time…. We’ve been hard at work on The Pantry, and there’s nothing quite like building your own business with your bare hands to work up an appetite. We’ve been working so hard, in fact, that I invited my most carnivorous friend Scott to Seattle, to help my tiny little muscles. Because in case you didn’t know this, construction, it is physical. After weeks ripping sheet rock from the walls, nailing boards to form our new ceiling, scraping the linoleum off of the floor to find (gasp!) a SECOND layer of linoleum, I found myself with a small bit of time before we start jackhammering (oh yeah, you heard me) the concrete in our future garden. Give me a night off with some of my meat-loving friends, and some porky goodness is sure to show up. Carnitas. That deliciously salty, crispy, sweet, melt in my mouth porkfest was calling. But hold your carnitas, because there’s new tortilla in town.
Here’s the thing. I know you’re supposed to like corn tortillas better, because that’s the “authentic” Mexican way. But guess what? I’m not from Mexico. In fact, being from Alabama, I’m doing good just to have graduated past Taco Bell. So I’m here to admit for the world wide web to hear: I like flour tortillas better. Not the stretchy, gummy kind of steamed flour tortillas you get at a taqueria (oh how I miss you, dear Mission district), but something with some chew to it. Blistered from heat and even a little puffy. I could munch on good flour tortillas daily. The problem? Good flour tortillas are few and far between. As per usual, I thought, why not make my own? So I did. And they were perfection. I now pass the baton to you.

A note about lard: If you don’t have time to make your own, then you should be able to find freshly rendered lard at a good butcher shop. Even if you don’t see it, just ask, because sometimes they keep it hidden away. This time I got my lard from Rainshadow Meats on Capitol Hill.
Flour Tortillas Recipe:
Makes 8 tortillas.
2 cups AP flour
1 tsp baking powder
1 1/4 tsp salt
6 TBSP fresh lard, RT
3/4 cup milk, warm
– Mix together the flour, baking powder and salt. Add the lard and work in you’re your hands until all of the flour is coated.
– Add the warm milk and stir the mixture with a spoon until it forms a dough. Knead for 4 minutes on a floured surface. The dough should be firm and soft.
– Place the dough in a bowl and cover with a damp cloth or plastic wrap for 30 minutes.
– After the dough has rested, roll it into a log. Slice the log into into eight discs. Use your hand to flatten each disc, then place on a plate without touching each other. Cover the dough with a damp cloth or plastic wrap for 10 minutes. After the dough has rested, one at a time place a piece on a floured surface and roll with a rolling pin from the center until it’s thin and about eight inches in diameter. Keep rolled-out tortillas covered until ready to cook.
– In a dry cast iron skillet heated on high, cook the tortilla about thirty seconds on each side. It should start to puff a bit when it’s done. Keep cooked tortillas covered wrapped in a cloth until ready to eat. They can be reheated in a dry iron skillet.


68 comments