How to picnic like it’s your wedding day.
So this year was a big one for me. The Pantry turned one, I finally went to Canada, and after dating for 6 years, me and John got married.
I know, I know: A) this post is over due (sorry, yet again!) and B) It’s frickin’ Thanksgiving, all you want to hear about is another variation on sweet potatoes and brussels sprouts. But think of this as a holiday oasis post, a place you can come to forget about the will-it-EVER-stop rain (if you live in Seattle) and instead remember summertime, picnic blankets, sundresses and adorable foods on crackers.
It was a gorgeous August weekend in the Cascade Mountains, 80 degrees and sunny, with the crisp waters of Lake Wenatchee a five minute drive away. It was a weekend filled with friends, singing, dancing, and of course, whole lot of food.

I was never going to be a traditional bride — white ball gowns and pretty pictures of me gazing into the sunset are definitely not my thing. And I’ve got plenty of political ideas about marriage and taxes and civil rights that have kept me from taking the idea of a wedding seriously for most of my life. It really took a mental shift, reframing the idea of a wedding ceremony to get me on board. It doesn’t have to be about poofy dresses and until sickness and death parting us, or about weird beef dishes from the 60s and the electric slide. It can be about friends. And our rather tiny families. And celebration. And where there’s celebrating, there’s food. And board games. And lawn games. And a lemonade stand. And midnight re-enactments of frogger with hacky sacks. And karaoke with lots of dancing.

Since so many of our guests were coming from far away, we wanted the wedding to to take over a weekend, giving us as much quality time as possible — and, of course, providing us with plenty of opportunities for meals.
I like to dream big, and I’ve never met a culinary challenge that was too intimidating. So as you can imagine, the days leading up to the wedding were slightly insane. I am forever indebted to all my friends who spent many hours cooking, pickling, packaging, and labeling all the food that would become welcome snacks for our guests, breakfast baskets that got delivered to everyone’s cabins, and finally make it into the main event: a wedding picnic in the mountains.

We spent months scavenging for picnic baskets, vases and picture frames at the thrift stores, and then painted them all bright aqua blue. We filled them with all of our favorite things, and sewed napkins, streamers and pillows out of vintage fabric I found at my great-grandmother’s house in Alabama. Actually full credit for napkin sewing goes to Mariah, my close friend and inspiration for all things domestic, because she didn’t even blink when I dropped a box of vintage fabric on her porch before hopping on a plane back to Seattle. It was not a white wedding. It was bright. It was patterned. And nothing matched. It was perfect.

We had olives marinated with rosemary, orange and chile flakes, and herb roasted nuts.

A tuna salad with tarragon, fennel and celery leaves, concocted by my business partner Olaiya Land, that pretty much stole the show.

Some Olympic Provisions salami and our favorite cheeses: Cowgirl Creamery’s Mt. Tam and Jasper Hill’s clothbound cheddar.

Pickled cucumbers with fennel fronds and some red pepper jelly that my family is still asking about.

Smokey baba ganoush, which I think is responsible for keeping me fed the entire weekend, and a white bean and kale salad dressed with a preserved lemon vinaigrette, recipe courtesy of our friends at Picnic.

And since I’m a pastry chef and John has an unrivaled sweet tooth, there was plenty of dessert: lemon pound cake and my most favorite banana bread ever, and rhubarb ginger jam made by Rebecca of Deluxe Foods. Three days before the ceremony I let go of the plan to make homemade nutella. It was the right decision.

I still think about that weekend. Having everyone with us, being able to feed them. Swimming in the lake, playing kickball in the sun, eating dinner under the stars – I can’t even imagine a different kind of wedding. Thank you to all of my friends, for being there and for being so awesome. And a special thank you to Gabe and Ashley Rodriguez, for taking such beautiful pictures that will make me remember that weekend in visual style.

Marinated Olives w/ Rosemary, Orange & Chile
8 cups caselvetrano olives
4 cups olive oil
4 oranges
4 six-inch sprigs rosemary
1 tsp chile flakes
8 garlic cloves
– Using a vegetable peeler, remove zest from orange in long, wide strips. Smash garlic cloves with the edge of a chef’s knife.
– Place the olive oil in a small saucepan along with the orange zest, rosemary, pepper flakes and garlic. Warm over medium heat until fragrant but not boiling or simmering. Turn heat to medium-low and add olives. Stir occasionally for about 5 minutes. Do not cook olives. Pour olives and oil into serving dish and accompany with crusty bread for dipping in the oil.
—————————
Roasted Mixed Nuts
8 oz pecans
8 oz cashews
8 oz almonds
6 oz hazelnuts
6 oz walnuts
1/4 cup chopped rosemary
1 tsp cayenne pepper
4 tsp dark brown sugar
4 tsp Maldon salt
1 oz butter, melted
-Preheat the oven to 350 degrees F.
-Toss the nuts in a large bowl to combine and spread them out on a baking sheet. Toast in the oven until light golden brown, about 10 minutes.
-In a large bowl, combine the rosemary, cayenne, sugar, salt and melted butter.
-Thoroughly toss the toasted nuts in the spiced butter and serve warm.
—————————-
Tarragon Tuna Salad
15 oz good tuna in oil, w/oil (I like Tonno brand)
3 TBSP chopped tarragon
2 tsp chopped parsley
1/2 cup finely diced fennel
1 stalk celery, finely sliced
1/4 cup minced red onion
2 TBSP lemon juice
1/2 cup loosely packed celery leaves
1/4 cup mayonnaise
Freshly ground black pepper, to taste
Kosher salt, to taste
Pinch sugar, to taste
– Break the tuna into rough chunks.
– In a medium bowl, combine all the ingredients except for the salt, pepper and sugar. Mix gently, to combine. Season with a generous amount of black pepper and a pinch of salt and sugar, if needed.
———————————
Red Pepper Jelly
1 1/2 lb red bell peppers, cut into 1-inch pieces
1 TBSP red-pepper flakes
1 tsp smoked paprika
3 TBSP Sure-Jell less- or no-sugar-needed pectin
3 1/4 cups sugar
1 cup white-wine vinegar
1 TBSP unsalted butter
3/4 tsp kosher salt
– Pulse bell peppers with red-pepper flakes and smoked paprika, if using, in a food processor until finely chopped. (Mixture will measure about 2 1/2 cups.)
– Whisk together pectin and 1/4 cup sugar in a small bowl.
– Stir together pepper mixture, vinegar, butter, salt, and remaining 3 cups sugar in a 5- to 6-quart heavy pot. Bring to a vigorous boil over high heat, then continue to boil vigorously, stirring occasionally, 5 minutes. Gradually add pectin mixture, whisking constantly. Return jelly to a vigorous boil, stirring constantly, and boil, stirring constantly, 1 to 2 minutes (mixture will thicken slightly). Remove from heat.
——————————–
Best Banana Bread Ever
1 lb peeled, very ripe bananas
9 1/2 oz sugar
1 vanilla bean
5 1/4 oz melted butter
2 eggs
7 1/2 oz AP flour
1 1/2 tsp baking soda
1 tsp kosher salt
– Preheat the oven to 350 degrees (325 conv.). Butter loaf pans and line with parchment. Set aside.
– Rub the vanilla bean seeds into the sugar to make a vanilla sugar. Beat bananas and sugar well with paddle, then add the butter slowly.
– Add the eggs one at a time.
– Sift the dry ingredients and then add.
– Spoon into the prepared cake pans and bake until the cakes spring back when touched lightly in the center. Cool before removing from the pan.
Aaaaaand I’m back! With Moussaka!
Wow. That break was a bit longer than anticipated. Sorry about that. But it has been quite a year! The Pantry has taken off, and I paused for a bit, to focus on that. And then it seems that I just kept pausing. Blogging pauses are like gym pauses, once you lose the routine, it just feels crazy to jump back in. It’s not like I haven’t been cooking, because believe me, there’s been plenty of food in this kitchen. I started getting post anxiety, and then it was just too easy to find a reason not to blog about my adventures. Weird-looking food, too hard to photograph. Poor lighting, why bother? Dinner company, I didn’t want to inconvenience them. I have no idea where the camera is, well, that was just laziness talking.
Oh yeah, and did I mention that I got married? Which of course was the mother of excuses, and then the mother of salvations. OBVIOUSLY I couldn’t be blogging while planning a wedding (which, by the way, kicked some serious ass), but I could write ABOUT the wedding. It would be my comeback piece, my big project, the perfect excuse for taking 6 months off. And then of course the size of the post scared the mess out of me.
So here I am, back on my blog, with what some might describe as a very humble offering: moussaka.

But you see, I love moussaka. And you know what else? It’s weird looking. It was a grey day. And I still haven’t found the real camera and had to borrow the pocket one that John got in trouble for buying last time he was in New York. But I’m back on the horse, and isn’t that what matters? Next to this dreamboat of a Greek casserole that is.

For those of you who haven’t been introduced to moussaka, it is a tricky one. And I don’t blame you for being suspicious. Most versions I’ve eaten in Greek restaurants are just awful. And clearly several days past their prime. At worst, it’s lukewarm mushfood. But at it’s best, it’s just glorious. A layer of roasted slices of potato. A layer of lamb cooked in cinnamon, nutmeg and allspice. A layer of roasted slices of eggplant. All beneath a charred and fluffy layer of bechamel that reminds me of toasted marshmallows. I ate this version at Kokkari in San Francisco (random side note, when I was still an architect, I totally designed the addition on Erik Cosselmon’s house. Crazy!) and it was quite a memorable experience. Really, I think I ordered the moussaka because I was impressed that he had the nerve to charge $20 for it. Well, it was worth every penny and maybe a few more. When Kokkari came out with a cookbook, I ran out and bought it without thinking twice, because I just knew that a recipe for the moussaka would be included. And it was. And I’ve made it. And now you should.

And yes, that post on the wedding picnic is coming. I’ve got a 12-hour honeymoon plane flight coming up, and no excuses.
Kokkari Moussaka (10 servings)
2 globe eggplants, about 1 pound each
1/2 cup plus 2 tablespoons olive oil
Sea salt and freshly ground pepper
2 pounds Yukon Gold or other yellow-fleshed potatoes
Kokkari Béchamel Sauce (recipe follows), made with 7 1/2 cups milk
1 large egg
2 large egg yolks
1/2 cup grated kefalotyri or Parmesan cheese
1/2 cup Greek-style whole-milk yogurt, homemade or purchased
1/4 teaspoon ground nutmeg
Lamb Filling (recipe follows)
– Preheat the oven to 425°F. Remove the ends of the eggplants and score them lengthwise in 4 to 6 places, then cut crosswise into 1/2-inch-thick slices. Arrange on a wire rack and salt both sides lightly. Let drain for about 1 hour, then pat dry.
– In a bowl, combine the eggplant slices and the 1/2 cup olive oil. Toss to coat the slices evenly, then arrange them on a heavy baking sheet in one layer. Season both sides with salt, using a total of 1 teaspoon. Grind some pepper over the top and bake until the eggplant is tender, 20 to 25 minutes.
– Peel the potatoes and slice them 3/8 inch thick. Toss them in a bowl with the 2 tablespoons olive oil, 1 teaspoon salt, and a few grinds of pepper. Arrange them on a heavy baking sheet in one layer and bake until tender, 20 to 25 minutes. (You can bake them at the same time as the eggplant.)
– Whisk the béchamel until smooth and no longer stiff. Whisk in the egg, egg yolks, cheese, yogurt, and nutmeg to make a custard topping.
– In a 15-by-10-by-2-inch baking dish, arrange the roasted potatoes in a single layer. Top with the lamb filling, compacting it into an even layer with the back of a wooden spoon. Top with the roasted eggplant slices in a single layer. Dollop the custard topping on top, then spread gently into an even layer. Set on a baking sheet and bake until well browned and set but still quivery, 45 to 50 minutes. Let cool for at least 45 minutes before slicing.
Lamb Filling
1/4 cup extra-virgin olive oil
1 pound white onions, chopped
2 1/2 pounds ground lamb shoulder
1/4 cup Italian tomato paste
2 tablespoons honey
2 bay leaves
1 1/2 teaspoons ground allspice
1 1/2 teaspoons ground nutmeg
1 1/2 teaspoons ground cinnamon
Sea salt and freshly ground pepper
– Put 1/4 cup of the olive oil and the onions in a large skillet. Sauté over high heat until the onions soften slightly and begin to smell sweet, about 4 minutes. Do not allow them to color. Add the ground lamb and sauté, breaking up the meat with a wooden spoon, until the lamb is no longer pink and there are no clumps, about 3 minutes. Continue cooking until the meat releases its juices, 2 to 3 minutes longer. Drain in a colander set over a bowl. Return the meat to the skillet. Let the juices settle for about 5 minutes, then skim the surface fat with a soup spoon and return the skimmed juices to the skillet with the lamb.
– Add the tomato paste, honey, bay leaves, allspice, nutmeg, cinnamon, 1 tablespoon salt, and several grinds of pepper. Simmer gently, uncovered, stirring occasionally, until all the liquid has been absorbed and the meat is moist but not soupy, about 10 minutes. Remove the bay leaves.
Kokkari Béchamel Sauce
8 ounces unsalted butter
1 cup unbleached all-purpose flour
7 1/2 cups whole milk, warmed
Sea salt
– In a large, heavy pot, melt the butter over medium-low heat. Whisk in the flour all at once and cook, whisking constantly, until the mixture just begins to darken and smell nutty, about 3 minutes.
– Add 2 cups of the milk to the pot and whisk until smooth. Add another 2 cups and whisk again until smooth. The mixture will look like creamy mashed potatoes. Whisk in the remaining 4 cups milk and 1 1/2 teaspoons salt. Bring to a boil, reduce the heat to low, and cook for 20 minutes to eliminate the raw flour taste. Stir frequently with a wooden spoon to prevent the sauce from scorching, and scrape the sides of the pot occasionally with a heatproof rubber spatula.
– Transfer the sauce to a large bowl and cover loosely with plastic wrap. Let cool, then cover tightly and refrigerate for up to 2 days.
Homemade Hot Sauce!
Sunday night we had our first Down South dinner at The Pantry. Boiled peanuts, homemade saltine crackers with pimento cheese and smoked ham, succotash, fried chicken, buttermilk biscuits. I have to admit, it was kind of amazing. Maybe I’m biased to Southern food in general, but there was something beautiful about watching complete strangers sit around the table and get in there with their fingers. The thing that threw it over the edge for me?
Homemade hot sauce.
You know the stuff. It’s pretty. It’s hot. It’s usually that awesome shade of orange that I can never find a paint chip to perfectly match. It makes me drool a little just to think about it. I’ve been buying this one brand, Youk’s, for years. The problem is that they only sell it online or in San Francisco, at this restaurant called Maverick. Needless to say, carting it back to Seattle after every trip got a little tedious. And once you’ve had the good stuff, it’s just hard to go back to Tabasco or Tapatío. If you’re as much a fan of the stuff as I am, then this is a very good day. I made it with my friend Brandon one day, a couple of weeks ago. It was kind of a shot in the dark, involving us poking around on the web for Southern-style recipes, then just winging it. It actually surprised me with how good it is. Who knew I had such little faith in myself? Anyhoo, get yourself to the farmer’s market before the peppers are gone, you’ll thank me.
We started by tossing some fresno chiles in olive oil and then roasting them in the wood-fired oven at Delancey for a bit. After they got nice and browned, we pureed them in a food processor with just enough vinegar to make them move around in there comfortably.

Then we placed the whole blob of pepper paste in a strainer and smashed it through. We took the liquid that came through and adjusted it with more vinegar, some water and lots of salt. And that’s it. So darn simple.

And crazy good. We made about 6 cups of it and have already gone through a quart. In two weeks. There’s been a lot of heartburn at The Pantry this month, but no one’s complaining.

Hot Sauce Recipe:
1 lb Fresno chiles
15 TBSP distilled vinegar
1 TBSP water
1 3/4 tsp kosher salt
– Trim the stems off of the chiles, leaving the base that the stem attaches to. Rumor has it that that part gives great flavor. Who am I to challenge a good culinary rumor?
– Toss the chiles in enough olive oil to coat them. Then roast them in a broiler, or grill them if you can. The goal is to get a nice char on them.
– Puree them in a food processor or blender with enough vinegar to keep them moving.
– Strain them through a fine sieve, smashing the whole time to get as much of the pulp as possible.
– Add the water, salt and the rest of the vinegar and pop in the fridge to chill for a few days. You can certainly eat it immediately, but it only gets better with time.
Finally, a Gratin
I’ve been searching for this recipe for quite a while now. A gratin. A great dish. A great word. Grataaaaaaaannnn… I could repeat it many, many times without getting bored. Maybe I should get a more interesting life?
But anyways, the point is that gratin should be easy enough. When I imagine it, it’s just like in Ratatouille, where I effortlessly slice some veggies and toss them into a shallow dish with a little cheese and herbs. A quick trip in the oven later and out comes a beautiful summer dinner. Somehow though, mine never go that way. They’re always too “something”: too watery, too heavy, too oily, too bland. I had all but given up on the gratin until I happened upon this recipe. The photo made me so hungry that I actually placed a zucchini gratin on the menu for a class I’m teaching at The Pantry because THEN I would HAVE to recipe-test it to perfection. Oh my friends, summer just got better. For me anyways. What better way to use up the mountain of summer squash growing in your garden than with trays and trays of crispy, cheese-laden, buttery breadcrumbed gratin?
Sure, this wasn’t as easy-peasy as the gratin in my fantasies, but it certainly was as tasty. I started by salting some thinly sliced zucchini until it released all of its water.

Then I got to work on the magic herby sauce that I would eventually toss the zucchini in.

And browned butter, did I mention that there was browned butter involved? It gets tossed into fresh breadcrumbs to make a nutty slice of heaven.

Everything got tossed together with some gruyere.

And baked until it was nicely browned and crispy.

And then yes, me and my good friend Merriss ate it straight out of the pan. There were some burned mouths by the end, but we didn’t really care. We were in a gratin coma.

I made a few changes to the original recipe: more cheese, slightly less oil and shallots, and a lot more lemon juice. I left out the jalapeno, which I know is a bit weird for me, but I really wanted the zucchini to have center stage on this one.
Zucchini Gratin with Salsa Verde
Yield: 4 servings
Salsa Verde:
1 teaspoon fresh oregano
1/4 cup coarsely chopped mint
1 cup coarsely chopped parsley
1 small clove garlic
1 anchovy
1/2 cup olive oil
1 tablespoon capers, drained
1 tablespoon lemon juice
1/2 teaspoon kosher salt
Black pepper to taste
Gratin:
2 pounds zucchini
1 1/2 cup fresh breadcrumbs
3 tablespoons unsalted butter
1/2 cup sliced shallot
1 teaspoon minced garlic
1 tablespoon fresh thyme
1 1/2 cups grated Gruyere cheese
– Heat the oven to 400 degrees. Cut the squash into 1/8-inch-thick slices. Toss the slices in a large bowl with 1 teaspoon kosher salt, and let sit for 30 minutes.
– Meanwhile, using a food processor, grind the herbs, garlic and anchovies and half of the oil to a paste. Transfer the mixture to a bowl.
– Gently pound the capers until they’re partially crushed and add them to the herbs. Stir in the remaining oil, the lemon juice, salt and black pepper. Taste for balance and seasoning.
– Place the breadcrumbs in a bowl. Heat the butter in a small saute pan over medium heat for a few minutes, until it browns and smells nutty. Pour the brown butter over the breadcrumbs, being sure to scrape all the brown bits into the bowl with a rubber spatula. Wait a minute or so for the butter to cool, and toss well. Set aside.
– Drain the squash well and transfer it to a large mixing bowl. Add the shallots, minced garlic, thyme, 1/2 cup of the salsa verde, and some pepper. Toss to combine, and add the cheese and half the butter-coated breadcrumbs. Toss again, and taste for seasoning.
– Place the squash in a 9-by-9-inch gratin dish. Scatter the remaining breadcrumbs over the top, and bake 40 to 45 minutes, until the squash is tender and the top is crisp.
What I’m eating these days.
So I had lots of plans for this post. I was working on this homemade snickers bar recipe. A recipe that I was certain would make me a certified candy-making badass. Salty roasted peanuts, sweet sticky caramel, fluffy chocolate nougat — you know the drill. And then I learned that nougat is hard. Quite hard. Literally hard, mine was. I couldn’t even get a knife through it.
So that post will have to wait a while, because life is kicking me in the butt these days. Classes and dinner at The Pantry are selling (Yay!) and we FINALLY finished grinding the glue off of our concrete floor, a month-long project that was pushing my sanity level to its edge. Sheet-rock is going up as I type, which means cabinets, counters and tile are up next. SO! MUCH! FUN! But, all this fun, just doesn’t leave much time for the elaborate cooking experiments that I just adore (sniff).
So I’m here to share with you what I actually eat these days: salad. And lots of it. Tuesday was my birthday, and we had a potluck in the under-construction space, and John made my most favorite summer salad ever, a salad that pretty much defined 2010 for me: a cabbage peanut salad to be exact. I found the original recipe in the book Blue Eggs and Yellow Tomatoes and have slightly tweaked it to my taste (less sugar, less acid, more heat).
Obviously you start with a lot of cabbage.

While this salad is light on technique, it is like salad crack for me. You toss the cabbage with carrots, cilantro (LOTS of cilantro) and bell peppers and then mix in a spicy peanut sauce that I have to stop myself from eating straight from the bowl with a spoon. So maybe being a busy bee is a good thing? No time for desserts means more munching on salads, just in time for bathing suit season… Oh yeah, and did I mention you throw peanuts all over the whole thing? I was such a hurry when I made this one that I forgot the peanuts before snapping a quick photo. I was literally throwing them onto people’s bowls as they walked out the door (it was a lunch break on a cabinet painting day, good times).

Cabbage Peanut Salad Recipe:
Peanut Dressing:
1/3 cup peanut oil
1/4 cup rice wine vinegar
3 TBSP soy sauce
1/3 cup peanut butter
2 TBSP brown sugar
2 TBSP grated peeled ginger
3 garlic cloves
1 finely minced jalapeno
– Mix all of the liquids in a bowl and set aside. In another bowl, mix together the peanut butter, brown sugar, ginger, garlic cloves and jalapeno. Slowly drizzle in the liquids, whisking constantly to emulsify into a smooth sauce. If your sauce doesn’t look so good, a few hits of an immersion blender should sort it out.
Salad:
1/2 head small green cabbage, thinly sliced
1/2 head small red cabbage, thinly sliced
2 red bell peppers, thinly sliced
2 large carrots, shredded on cheese grater
6 green onions, sliced
1/2 cup packed cilantro, roughly chopped
salt to taste
1/2 cups roasted peanuts
– Toss all of the salad ingredients together with the dressing. Taste for salt adjustment and dig in.
Homemade Pork Buns!
Dear Pork,
We meet again. This time things got intense. As per usual I was dabbling in vegetarianism, reading books like “Animal Factory” and “Eating Animals” and having thoughts like “I just can’t keep eating meat”. Then I bought a groupon for Barnes and Noble. Dammit, I blame it on them. I was perusing the shelves, looking for just the right present to myself (I’ve imposed a cookbook moratorium on myself so this was a big day). Then I saw it. A book I’ve been dreaming about since I read about it online: “Asian Dumplings” by Andrea Nguyen. My Lord, it’s like she wrote a book just for me. I snatched it up and stayed awake that night reading it cover to cover. But I’ve been so busy with my new business that I just didn’t have time to make anything from it for months! But finally, I got a day off. And what did I do? I made pork buns. Sticky, messy, slightly sweet, cracktastic pork buns.
First I marinated you in a magical sauce with all kinds of delicousness: five spice powder, hoisin sauce, honey, soy sauce and much more.

Then I laid you on a rack to go in the oven.

And roasted you until you were all glossy and charred and happy looking.

From there I took it a step further. I chopped you up into itty pieces and cooked you with more delicious sauciness.

While you waited patiently, I made a dough, a dough not too different from my favorite hamburger bun dough. I cut that dough into chunks.

And then I encased you in that dough, giggling with every pleat.

You made adorable dumplings.

I let your dough rise until soft, and then I roasted you again. I pulled you from the oven and glazed you with honey. And then me and friends devoured you. Oh my, sweet pork, you do continue to surprise me. Thank you, for setting me straight again.

PORK BUNS RECIPE (Andrea Nguyen):
Char Siu Pork:
1 lb bonelss pork shoulder
1 big clove garlic
1 1/2 TBSP sugar
1/4 + 1/8 tsp five spice powder
2 TBSP 3/4 tsp hoisin sauce
1 1/2 TBSP honey
1 TBSP + 1/2 tsp Shaoxing rice wine
2 1/2 TBSP soy sauce
1 1/2 tsp sesame oil
– Cut the pork into strips that are 1 1/2” thick.
– Mix the rest of the ingredients in a bowl large enough to fit the pork, this will be the marinade. Remove 1/3 of the marinade to a small bowl and store in the fridge. This will be used later on for basting the pork as it roasts. Toss the pork in with the rest of the marinade to coat evenly. Cover and refrigerate for 6-8 hours, turning the pork 2-3 times.
– Remove the pork and reerved marinade from the fridge and let sit at room temperature for 45 minutes. Preheat the oven to 475 degrees. Line a baking sheet with aluminum foil and place a roasting tack on top. Put the prok on the rack, leaving an inch between the pieces for heat circulation. Discard the used marinade.
– Roast for 30 minutes, basting both sides of the pork with the marinade every 10 minutes. Flip the pieces over at every interval. T]he pork is done when it is glazed and slightly charred, Remove from the oven. Let the meat rest for 10 minutes before using.
Pork Bun Filling:
1 TBSP sugar
1 pinch of salt
1 pinch of white pepper
1 TBSP soy sauce
2 tsp oyster sauce
1 TBSP water
2 tsp canola oil
2 scallions (white and green parts), chopped
1/2 pound Char Siu Pork, diced
1 tablespoon Shaoxing rice wine
1 1/2 TBSP cornstarch dissolved in
2 TBSP water
– To make the flavoring sauce, combine the sugar, salt, white pepper, soy sauce, oyster sauce, and water in a small bowl. Stir to dissolve the sugar and set aside.
– Heat the oil in a medium skillet over medium heat. Add the scallions, and cook, stirring constantly, for about 30 seconds, or until aromatic and slightly softened. Add the pork and combine well. Add the flavoring sauce and cook, stirring frequently, for about 2 minutes, or until the pork is heated through. Meanwhile, add the rice wine to the dissolved cornstarch. When the pork is hot enough, add the wine and cornstarch mixture. Cook for another 30 seconds, stirring constantly, until the mixture comes together into a mass that you can mound. Transfer to a bowl and set aside to cool completely before using. (The filling can be prepared up to 2 days in advance, covered with plastic wrap, and refrigerated. Return to room temperature before using.)
Dough:
10 TBSP whole milk
4 TBSP butter
2 tsp rapid-rise (instant) dry yeast
2 1/2 TBSP lukewarm water
1 large egg
2 1/2 TBSP sugar
12 1/2 oz All-purpose flour
1 large egg, lightly beaten
2 TBSP honey mixed with 1 TBSP warm water
– For the dough, melt the butter with the milk in a saucepan over medium heat. Set aside to cool for about 5 minutes, or until warm (about 110°F).
– Put the yeast in small bowl, add the water, and set aside for 1 minute to soften. Whisk in the milk mixture and the egg to blend.
– Combine the sugar and flour in a food processor. Pulse two or three times to blend. With the machine running, pour the yeast mixture through the feed tube in a steady stream. After a sticky mass of very soft dough forms, about 5 seconds, continue processing for 45 to 60 seconds to form a smooth, slightly sticky dough that mostly cleans the bowl. The finished dough should stick a bit to your finger when pressed. Alternatively, to make the dough by hand, combine the sugar and flour in a large bowl. Make a well in the center and pour in the yeast mixture. Slowly stir with a wooden spoon to work in all the flour. (Add water by the teaspoon if this doesn’t happen with relative ease.) Keep stirring as a ragged, soft mass forms. Then use your fingers to gather and pat the dough into a ball. Transfer to a work surface and knead for about 5 minutes, or until smooth, fingertip soft, and slightly elastic. (You should not need any additional flour on the work surface if the dough was properly made. Keep kneading and after the first minute or two, the dough should not stick to your fingers. If it does, work in a sprinkling of flour.) Press your finger into the dough; it should spring back, with a faint indentation remaining.
– Regardless of the mixing method, lightly oil a clean bowl and add the dough. Cover with plastic wrap and put in a warm, draft-free place (for example, the oven with the light on) to rise for about 45 minutes, or until nearly doubled.
– Line 2 baking sheets with parchment paper before beginning to assemble the buns.
– Remove the dough from the bowl and put on a lightly floured surface. Knead it a few times, then cut it in half. Cover one-half with plastic wrap or an inverted bowl to prevent drying. Roll out the dough into a 12-inch log, and then cut it into 8 or 16 pieces for medium or small buns, respectively. (Halve or quarter the log first to make it easier to cut even-size pieces. The tapered end pieces should be cut a little longer than the rest.) Lightly roll each piece between your hands into a ball and then flatten each one into a 1/4-inch-thick disk. Use a wooden dowel-style rolling pin to roll the pieces into circles, about 2 1/2 inches in diameter for small or 31/4 inches in diameter for medium buns. The rim should be thinner than the center; keep a 1-inch-wide belly. The finished circle will rise as it sits. Lay the finished circles out on your work surface, lightly dusting their bottoms with flour if you fear they will stick.
– To form a bun, hold a dough circle in a slightly cupped hand. Use a spoon or fork to center about 2 teaspoons of filling for small buns, or about 4 teaspoons of filling for medium ones, on the dough circle, pressing down very gently and keeping about 1/2 to 3/4 inch of the dough clear on all sides; your hand will automatically close slightly. Use the thumb of the hand cradling the bun to push down the filling while the other hand pulls up the dough edge and pleats and pinches the rim together to form a closed satchel. Pinch and twist the dough closed at the end. Place the bun pleat side down on the prepared baking sheet. Repeat with the remaining dough circles, spacing them 11/2 inches apart on the baking sheet. Loosely cover with plastic wrap or a kitchen towel. Set in a warm, draft- free place (for example, the oven with the light on) for 30 minutes to rise. Meanwhile, work on the other dough half to form more buns.
– To bake the buns, about 10 minutes before the rising time is over, position a rack in the middle of the oven and preheat to 350°F. (Let the buns finish rising at room temperature if you’ve had them in the oven.)
– Bake one baking sheet at a time, brushing the top and side of each bun with the egg right before baking. Bake small buns for about 14 minutes and medium buns for about 18 minutes, or until a rich golden brown; the cooked buns sound hollow when tapped on the bottom. Remove them from the oven, set on a rack, and let cool for 5 minutes.
– Brush the honey mixture on the buns for a sweet-glaze finish that will also soften the crust. Enjoy warm and out of hand. Refrigerate left- over buns for up to a week and reheat at 350°F for 8 to 10 minutes, until hot. When making the buns in advance, wait to brush on the glaze until after you’ve reheated the buns. These buns may also be frozen for up to a month. Thaw them completely before reheating.
Piggy’s Got a New Blanket
Okay, time to own up to another guilty pleasure.
You might remember a certain love letter, to a certain carnitas, written many a month ago. Well, it is carnitas time again. I mean, when is it ever not carnitas time…. We’ve been hard at work on The Pantry, and there’s nothing quite like building your own business with your bare hands to work up an appetite. We’ve been working so hard, in fact, that I invited my most carnivorous friend Scott to Seattle, to help my tiny little muscles. Because in case you didn’t know this, construction, it is physical. After weeks ripping sheet rock from the walls, nailing boards to form our new ceiling, scraping the linoleum off of the floor to find (gasp!) a SECOND layer of linoleum, I found myself with a small bit of time before we start jackhammering (oh yeah, you heard me) the concrete in our future garden. Give me a night off with some of my meat-loving friends, and some porky goodness is sure to show up. Carnitas. That deliciously salty, crispy, sweet, melt in my mouth porkfest was calling. But hold your carnitas, because there’s new tortilla in town.
Here’s the thing. I know you’re supposed to like corn tortillas better, because that’s the “authentic” Mexican way. But guess what? I’m not from Mexico. In fact, being from Alabama, I’m doing good just to have graduated past Taco Bell. So I’m here to admit for the world wide web to hear: I like flour tortillas better. Not the stretchy, gummy kind of steamed flour tortillas you get at a taqueria (oh how I miss you, dear Mission district), but something with some chew to it. Blistered from heat and even a little puffy. I could munch on good flour tortillas daily. The problem? Good flour tortillas are few and far between. As per usual, I thought, why not make my own? So I did. And they were perfection. I now pass the baton to you.

A note about lard: If you don’t have time to make your own, then you should be able to find freshly rendered lard at a good butcher shop. Even if you don’t see it, just ask, because sometimes they keep it hidden away. This time I got my lard from Rainshadow Meats on Capitol Hill.
Flour Tortillas Recipe:
Makes 8 tortillas.
2 cups AP flour
1 tsp baking powder
1 1/4 tsp salt
6 TBSP fresh lard, RT
3/4 cup milk, warm
– Mix together the flour, baking powder and salt. Add the lard and work in you’re your hands until all of the flour is coated.
– Add the warm milk and stir the mixture with a spoon until it forms a dough. Knead for 4 minutes on a floured surface. The dough should be firm and soft.
– Place the dough in a bowl and cover with a damp cloth or plastic wrap for 30 minutes.
– After the dough has rested, roll it into a log. Slice the log into into eight discs. Use your hand to flatten each disc, then place on a plate without touching each other. Cover the dough with a damp cloth or plastic wrap for 10 minutes. After the dough has rested, one at a time place a piece on a floured surface and roll with a rolling pin from the center until it’s thin and about eight inches in diameter. Keep rolled-out tortillas covered until ready to cook.
– In a dry cast iron skillet heated on high, cook the tortilla about thirty seconds on each side. It should start to puff a bit when it’s done. Keep cooked tortillas covered wrapped in a cloth until ready to eat. They can be reheated in a dry iron skillet.
Back to the Basics
Some things are so simple that I hesitate to share. But today, I’ve got a little snack that is making me a very happy girl. It is inspired by a dinner I had at Frankie’s on my last visit to NYC, and I can honestly say that it was the most memorable thing I ate there. The “it” I keep mentioning was a bruschetta, with a giant mound of fresh ricotta on top, drizzled with honey and a healthy shower of black pepper. I was in heaven. Sure, I’ve been known to sing the praises of ricotta to anyone willing to listen, particularly the homemade kind (because let’s face it, most of the stuff you get in a tub at the grocery store tastes like canned air). The truth is, I try to work in fresh ricotta whenever possible: gnocchi, galettes, pasta, cakes, fritters, we’re even serving a ricotta and blood orange dessert at Delancey right now. I LOVE RICOTTA. But even I sometimes have a bowl of delicious fresh ricotta in my fridge and the feeling of “there’s nothing to eat in the house”. I will say this no more, because the “honeyed and peppered ricotta cracker” is my new go-to. Try it, you’ll see what I’m talking about. I made them last night for the Academy Awards and I think I might have eaten 10 while no one was looking.

While the first time I tasted this combo was on bruschetta, I’m now a convert to serving it on crackers. And when I say crackers, I would hope it’s obvious at this point in our relationship that I’m talking about homemade ones. I know it sounds annoying to make your own crackers, especially after I just smacked down store-bought ricotta. But if I can find the time while working at Delancey and starting a new business, then I swear, you can do it too! Did I mention that it’s actually quite soothing? The dough is super easy, and I’ve found that I can make rather large batches in my KitchenAid mixer, freezing for later what I don’t need at the moment. Then whenever I need crackers, it’s as simple as rolling them out and baking them fresh!

I’ve been tweaking this recipe for over a year, getting the balance of flours and salt just so, and I’m feeling pretty good about it. But feel free to adjust to your own personal taste! The sea salt is great with the ricotta and honey topping, but I would never turn down a cracker with seeds and other yumminess. Get crazy, you’ll thank me! My one piece of advice: resist the urge to pull them out too early, this is your chance to get back at all those pasty bland crackers at the store. Color is flavor my friends!
Olive Oil and Sea Salt Crackers Recipe:
Yield: 50 crackers
1 lb AP flour
6.75 oz semolina flour
4.5 oz whole wheat flour
2 1/4 tsp salt
1 3/4 cups warm water
3/4 cup olive oil
extra olive oil and sea salt for topping crackers.
– Whisk together the flours and salt in a stand mixer bowl fitted with a dough hook. Mix the water and olive oil and add to the flours. Mix the dough at medium speed for about 5 – 7 minutes, until smooth. The dough should be just a bit tacky, but not difficult to work with. Add a bit more water or flour if needed.
– When you are done mixing, shape the dough into a large ball and rub with olive oil. Place in a bowl covered with plastic wrap and let sit at room temperature for 1 hour to relax the gluten.
– Preheat your oven to 475 degrees.
– Cut the dough into equal-sized pieces roughly the size of a billiard ball and flatten.
– Using a pasta machine, roll into a flat strip of dough, starting with the widest setting and working your way up to number 5. Lay the sheet of dough on a floured surface and cut into whatever shape you like. Set on a parchment lined baking sheet and brush each cracker heavily with olive oil. Top with sea salt and bake until golden.
– Cool completely.
Ricotta Recipe:
6 1/2 cups whole milk
1 1/2 cups heavy cream
2 cups cultured buttermilk
1 TBSP salt
– Combine everything in a large pot and cook over medium heat. When the mixture forms curds and the whey separates and becomes clear, turn off heat. Let it for 30 minutes for the curds to strengthen.
– Set a strainer over a container and line with 2 layers of cheesecloth. Pour ricotta onto cheesecloth and let strain until a desired consistency is reached.
– Stir in salt.
A dinner roll to be thankful for.
Oh Thanksgiving. What a fantastic day. A day fully devoted to food. And in my world, slippers and board games. I’ll admit that there were some culinary blah moments: leaky pie crust, not quite right brussels sprouts, a realization that even spending a lot of money on a locally raised heritage bird does not make turkey taste better than the side dishes. But there were some super happy moments: playing the train game, cauliflower caramelized in browned butter with pears and hazelnuts, and most important – Parker House dinner rolls. Yes, just like July 4th.
It was one of those serendipitous moments a month ago, when I was debating about what to serve with Thanksgiving dinner – my usual biscuits, a loaf of brioche, a nice crusty bread. My Saveur magazine came in the mail and I landed on the article where Tom Colicchio shares his recipe for Parker House rolls. I was immediately sold. I grew up on delicious rolls, or at least I think I did. No one actually made them from scratch in my family, so I’m not sure where I got the flavor memory of a delicate, buttery, yeasty roll. But it’s in there and that recipe was tickling that memory. And, my people, they were GOOD. So good in fact, that I made them again the day after Thanksgiving, to make sure I wasn’t blinded by Thanksgiving buffet hysteria.
First I made the dough. I let it rise in the warmest corner of my house and then shaped it into little balls.

I brushed the little balls with clarified butter and let them rise some more, until puffed and filling the pan.

I brushed them with even more butter and baked them until golden. While still hot I brushed them with…even MORE butter and sprinkled them with sea salt.

And then me and John started eating them, one by one. I think these little guys will find a happy home on my Christmas dinner menu…

PARKER HOUSE ROLLS RECIPE (Tom Colicchio, printed in Saveur magazine):
3/4 cup milk, heated to 115°
1 tsp active dry yeast
1 tsp barley malt syrup (I was out and used brown rice syrup)
2 cups flour
1 1/2 tsp salt
1¼ oz unsalted butter, softened
¼ cup clarified butter
Fleur de sel, to garnish
– Stir together the milk, yeast, and malt syrup in a large bowl and let sit until foamy, about 10 minutes. In a medium bowl, whisk together flour and salt. Add to the milk mixture along with the softened butter and stir with a wooden spoon until a dough forms. Transfer to a lightly floured work surface and knead until smooth, 5–6 minutes. Transfer dough to a bowl that has been lightly greased with clarified butter and cover with plastic wrap. Let sit until nearly doubled in size, about 1 hour. Uncover and punch down dough. Cover and let sit until puffed, about 45 minutes.
– Heat oven to 350°. Portion dough into sixteen 1 1/2″-diameter balls, about 1.1 oz each, and transfer to a greased 8″ cast-iron skillet or 8″ x 8″ baking pan, nestling them side by side; cover loosely with plastic wrap and let sit until doubled in size, about 2 hours. Brush with clarified butter and bake until puffed and pale golden brown, 20–22 minutes. Transfer to a rack and brush with more clarified butter; sprinkle each roll with a small pinch of fleur de sel and serve warm.
NOTE: They definitely want to be eaten within the first few hours of being baked, straight from the oven if you can manage.
The Ultimate Wintery Nuts
First, an announcement.
I’m starting a business! And not just any business, I’m starting my DREAM business! I’m teaming up with Brandon Pettit, owner of Delancey (were I am the pastry chef) and the super talented Olaiya Land, who runs Olaiya Land Catering and teaches classes in Delancey on closed nights to open up a community kitchen called “The Pantry at Delancey.” We’re blowing out the wall behind Delancey and building an awesome kitchen. Think rustic. Yet urban. Think 16′-long farm table. Jars of pickles and jams lining the walls. The idea is to get people around the table, cooking, learning, and talking. We’ll host family-style dinners, teach hands-on cooking classes with an emphasis on craft, provide locally sourced catering, host community events and begin making the cheese and curing the meats for Delancey. It’s just too much good stuff. I would send you to a website, except it isn’t finished yet. Until it is, you can find us on facebook. So know that while I have slowed down a bit on my blogging, it is only because things are HAPPENING!
Now, about these nuts. They are my new favorite wintertime crack. I developed the recipe for Delancey over the summer, when we were opening a patio and tinkering with the idea of bar snacks. They were quite a hit until the weather turned warm, when their dark spiciness started to look silly next to a fresh tomato salad. So we pulled them for the duration of the warm weather and just this week brought them back. I. love. them. So much that I want to share.
You start with a good mix of nuts. I like almonds, cashews, pistachios and pecans, but you can try any mix you like. Except the pecans are a must. They have a density that fits this kind of candying like peanut butter to jelly. I usually throw in some extra of those, to make up for the ones I end up snacking on.

I made a syrup out of water and sugar and brought that to a boil. I then added the nuts, along with the spice bomb and let them simmer away for a bit.

Then I strained the nuts out of the syrup and roasted them.

Until they were nice and deeply caramelized.

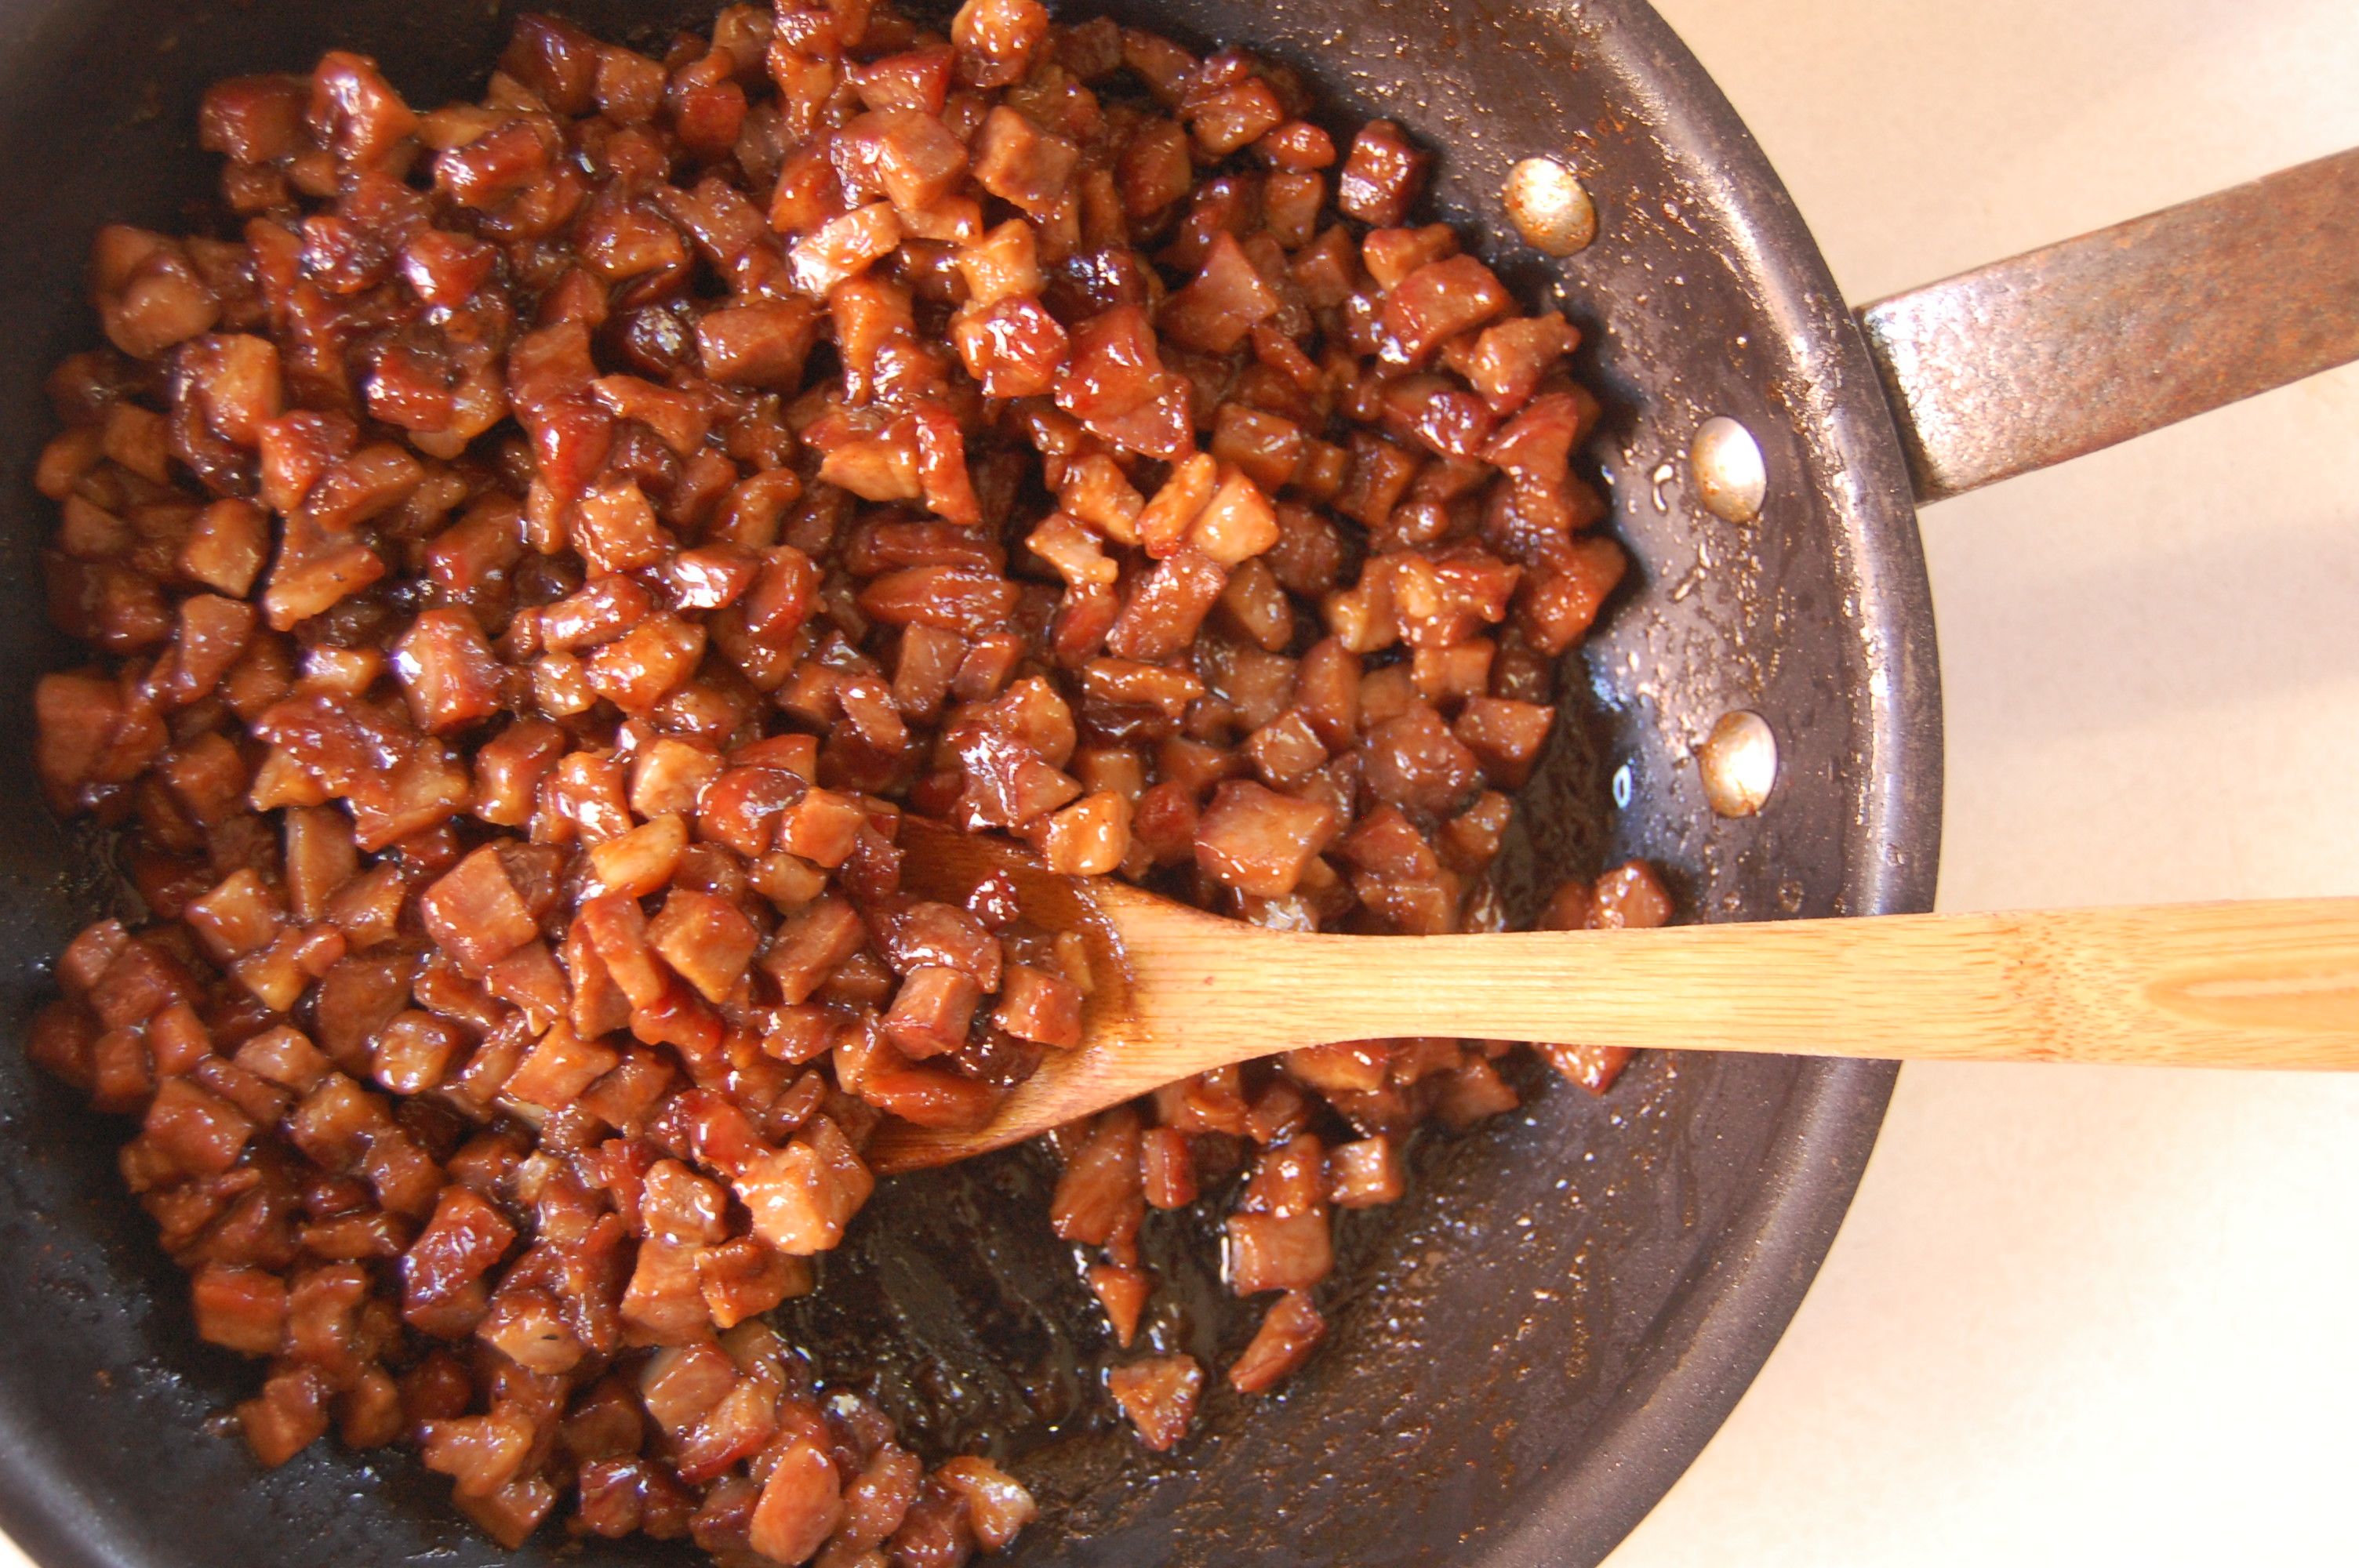
Then began the fun, candying some bacon to throw in the mix. Because what’s the point of spiced nuts without some pork?

I coated bacon with brown sugar and roasted it until the sugar was dark and caramelized.

I tore the bacon into chunks and tossed it with the nuts. And I’ve been munching away since…

SPICED NUTS WITH CANDIED BACON RECIPE:
2 TBSP vegetable oil
3½ cups sugar
3 cups water
4 cups raw nuts
1 TBSP + 1 tsp salt
2 tsp garam masala
1 tsp cumin
⅛ tsp cinnamon
⅛ tsp allspice
1½ tsp cayenne
12oz sliced bacon
1½ cups brown sugar
– Preheat the oven to 400 degrees.
– Coat a baking sheet with the vegetable oil. Set aside.
– Combine the sugar and water in a large pot and bring to a boil. Lower heat to medium high and add the nuts, salt and spices. Bring up to simmer and cook for 8 minutes.
– With a slotted spoon, remove nuts from pot, shaking off excess liquid. Spread onto the oiled baking sheet. Reserve the liquid for future batches of nuts.
– Roast in the oven until browned, about 15 minutes. Remove from oven and let cool completely.
– Lower oven to 350 degrees. Line a baking sheet with a silicon mat. Sprinkle half of the brown sugar onto the silicone mat. Place the bacon onto brown sugar and sprinkle on the remaining brown sugar.
– Roast for about 25 minutes, flipping bacon 3-4 times, every 7-8 minutes. The bacon should look caramelized. Remove from oven and use tongs to lift the bacon onto a clean tray. Cool completely.
– Chop bacon and toss with nuts.
– Taste for salt adjustment.


22 comments