Because some things just need to be shared.
Something happened this week. I was teaching a class on enriched breads, and had spent weeks testing and testing to get everything perfect. There was pain de mie, beautiful braids of challah, petit brioche a tete, and lots of parker house rolls. When I envisioned the class, I pictured mountains of breads, which I personally found very appealing. But I was worried that people wouldn’t think it was exciting enough. I needed some intrigue. A wild card. Something to get people in the door. I needed cinnamon rolls.

I’ll be honest, two weeks ago I was pretty ambivalent about cinnamon rolls. Sure, they were nice. I mean, who’s going to complain about swirly squishy bread covered in cinnamon and frosting? But I had never had my mind blown by a cinnamon roll. Cinnabons are pretty good, I guess, but I can literally taste the chemicals on my tongue after attempting to eat one of those. Weirdly enough, when I was thinking back to formative cinnamon bun years, they seemed to revolve around those canned ones at the grocery store that you ice yourself and aren’t even swirly. A dressed up version of those, that was the cinnamon bun of my dreams. So with that weird little canned bun in mind, I set about developing a recipe.
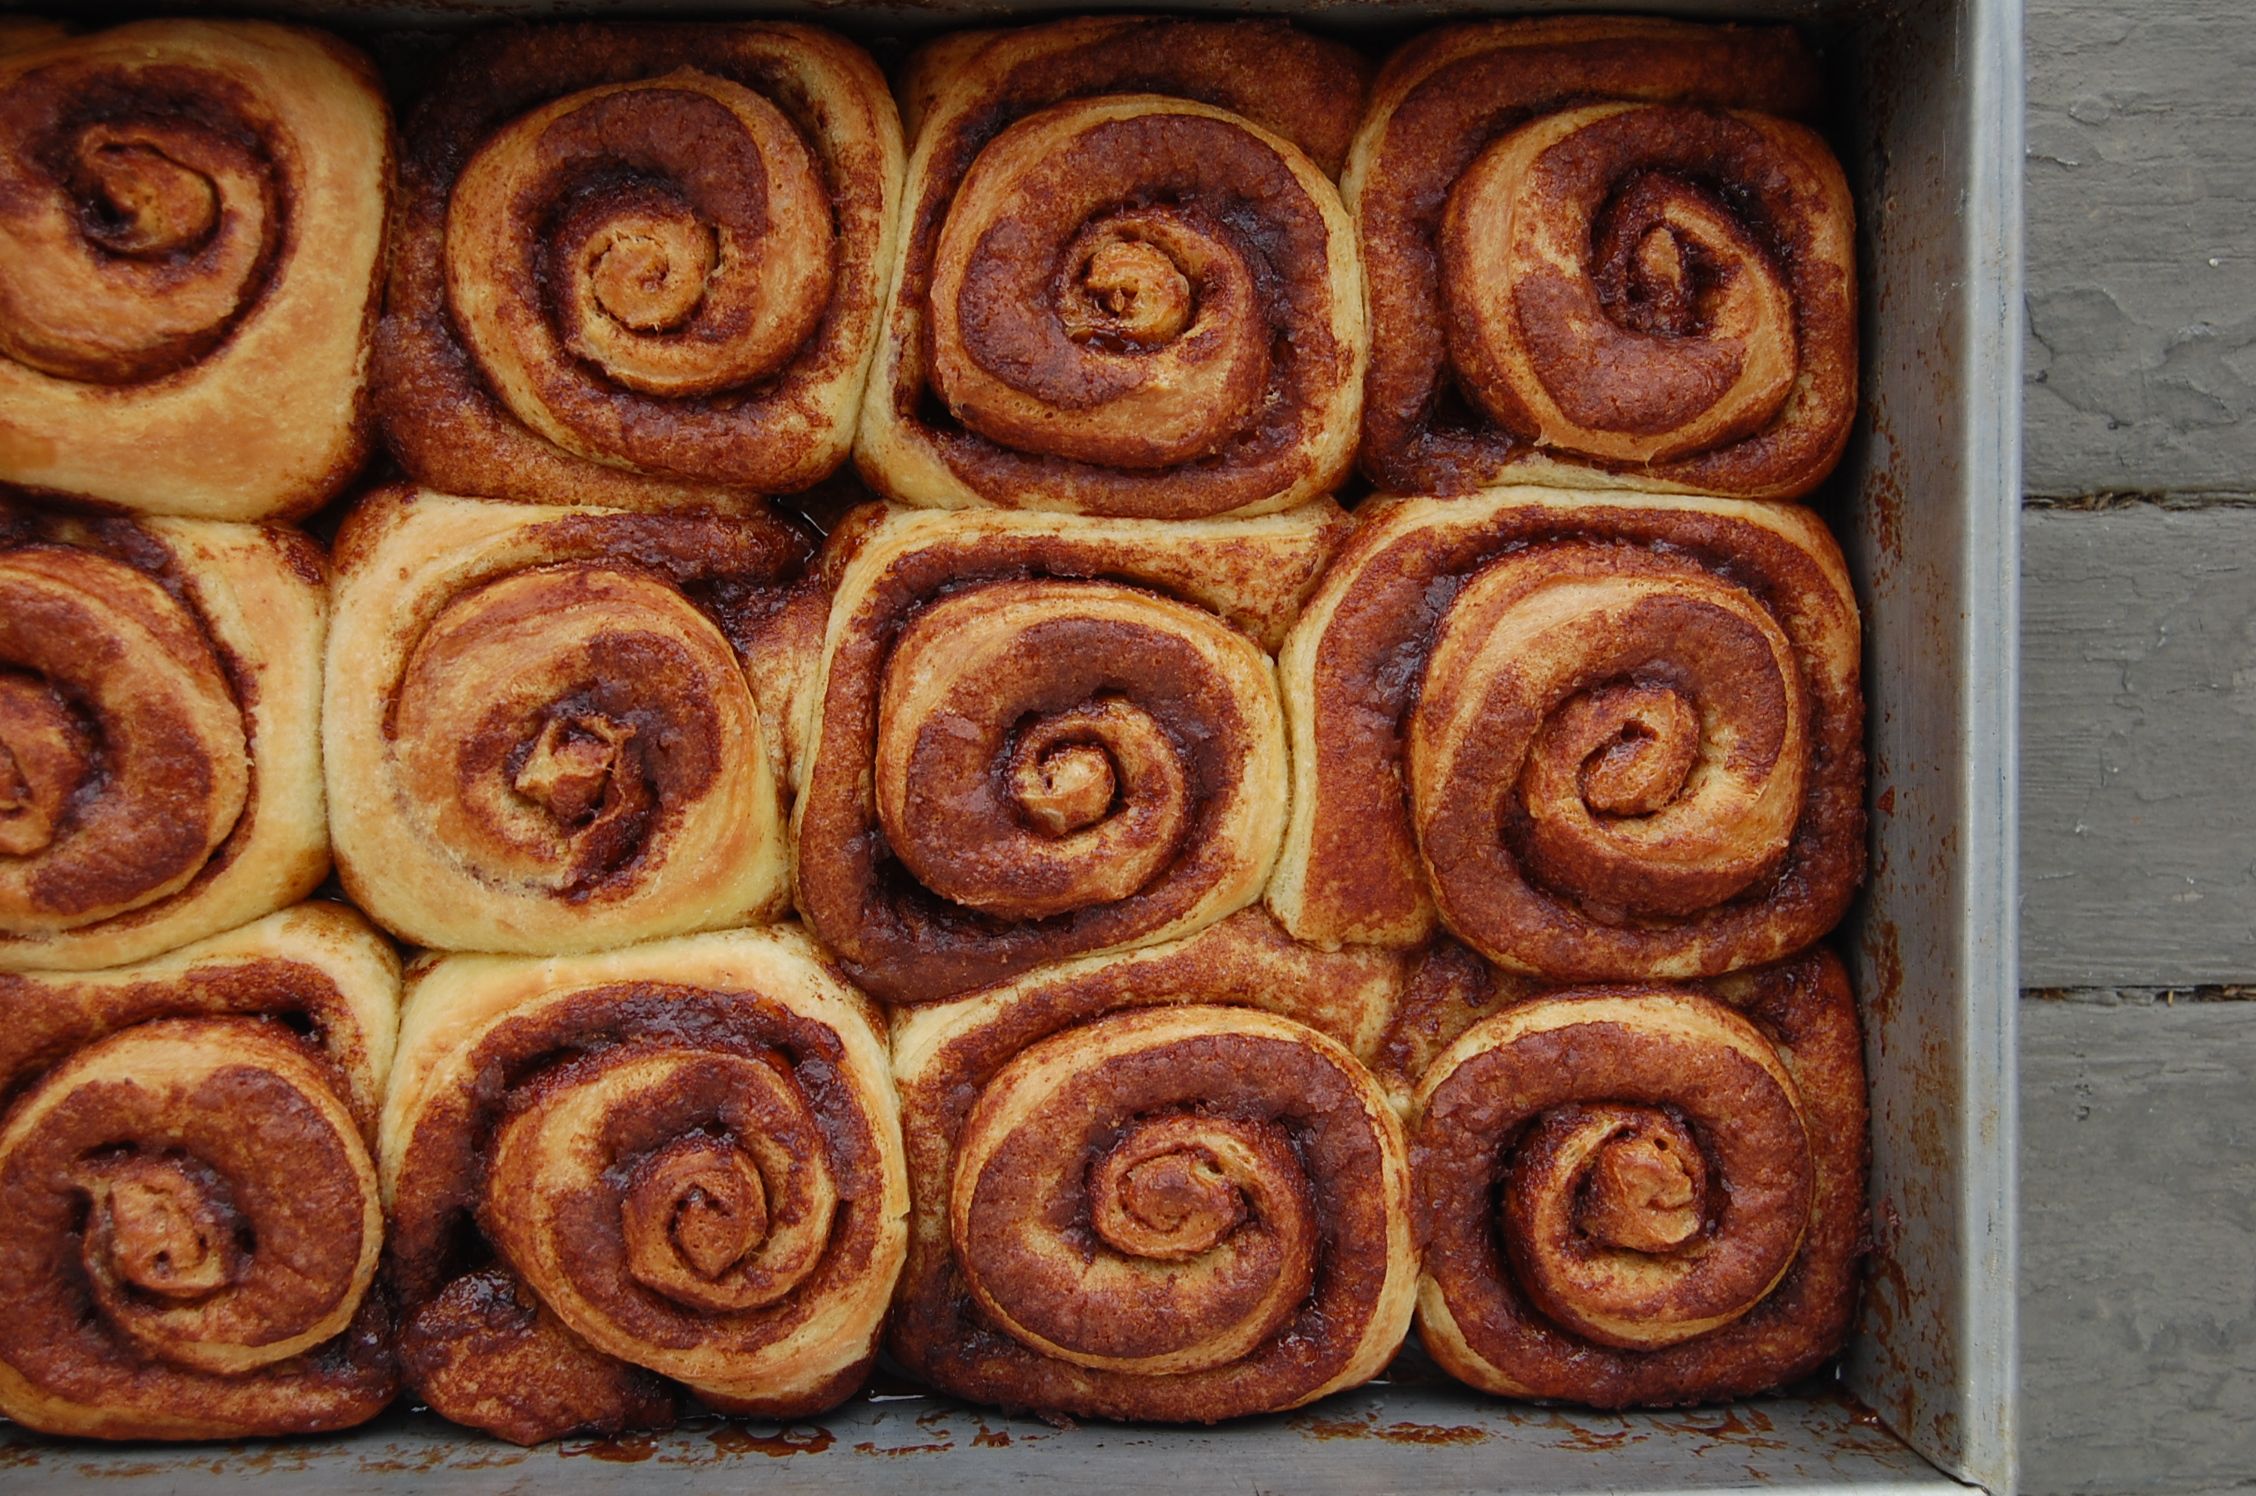
It only took about four tries. It helped that I already had the dough worked out from the sticky pecan buns that I taught last summer (aaaah, another blog post that I started and never finished…sigh). It was all about getting the flavors right. And I’m pretty sure I nailed it. I’m also pretty sure that in those four days of trying, followed by four days of teaching and baking the rolls, I transitioned from an ambivalent cinnamon roll passer-by to a full fledged devotee. Around day 6 I started dreaming about them. Then I started seeing them everywhere: coasters, camera lenses, even my cat all rolled up while sleeping started looking like a cinnamon bun that I really, REALLY wanted to nibble on (as if I actually eat them that daintily). It was all I talked about on facebook, prompting some recipe requests, which made me think: “hey, I know what I haven’t done in a while: a blog post!” So here I am, sharing these rolls, because dammit, they are worth breaking my four-month blog pause to share. Enjoy.
Cinnamon Rolls:
Yield: 12 rolls
Dough:
12 ounces bread flour
1 1/2 tablespoons sugar
1 1/2 teaspoons instant yeast
1/2 teaspoon kosher salt
3 ounces whole milk, lukewarm
3 large eggs, room temperature
1 egg yolk, room temperature
6 ounces unsalted butter, soft
Cinnamon Filling:
5 ounces brown sugar
5 teaspoons cinnamon
1/4 teaspoon kosher salt
3 ounces unsalted butter, soft
Cream Cheese Glaze:
2 1/2 ounces cream cheese, soft
2 ounces unsalted butter, soft
3/4 cup powdered sugar
1/4 teaspoon kosher salt
1/2 vanilla bean or 1/2 teaspoon vanilla extract
1 tablespoon milk
Make the dough:
– Stir together the flour, sugar, yeast and salt in a stand mixer bowl (or large mixing bowl). Combine the milk and eggs in a separate small bowl. Pour the egg mixture in the dry mixture and stir until smooth. Let this mixture rest for about 5 minutes so that the gluten can begin to develop.
– One piece at a time, knead in the butter, waiting until each addition of butter assimilates before adding more. This will take a few minutes. Continue mixing for about 6 more minutes, or until the dough is very well mixed. You will have to scrape down the bowl from time to time as the dough will cling to it. The dough will be very smooth.
– Place the dough in a large bowl. Cover the pan with plastic wrap. If making that day, place in a warm spot to rise. Once risen, place in the fridge to chill before rolling, As cold dough is much easier to work with. If making in advance, put the dough into the refrigerator and chill overnight, or for at least 4 hours.
Assemble the buns:
– Mix together the cinnamon, sugar and salt and set aside.
– On a floured work surface, roll out the brioche into rectangle about 12 by 16 inches and 1/4-inch thick. It should be fairly easy to roll. Position the rectangle so a long side is facing you. Spread the soft butter evenly over the entire surface of the dough, then sprinkle on the cinnamon sugar mixture. Starting from the side closest to you, roll up the rectangle like a jelly roll. Try to roll tightly, so you have a nice round spiral. Trim off about 1 inch from each end of the roll to make them even. If at any point the dough becomes warm or sticky, place it in the fridge to chill for 10 minutes.
– Use a bench scraper or knife to cut the roll into 12 equal pieces, each about 1 1/2-inches wide. At this point, the unbaked buns can be tightly wrapped in plastic wrap and frozen for up to 1 week. When ready to bake, thaw them, still wrapped, in the refrigerator overnight or at room temperature for 2 to 3 hours, then proceed as directed.
– Butter a 9”x13” baking pan. Arrange the buns, evenly spaced, in the pan. Cover with plastic wrap and put in a warm spot to proof until the dough is puffy, pillowy, and soft and the buns are touching-almost tripled in size, about 2 hours.
– Position a rack in the center of the oven, and heat to 375 degrees. Bake until golden brown, about 20 to 25 minutes. While the cinnamon rolls are baking, prepare the glaze.
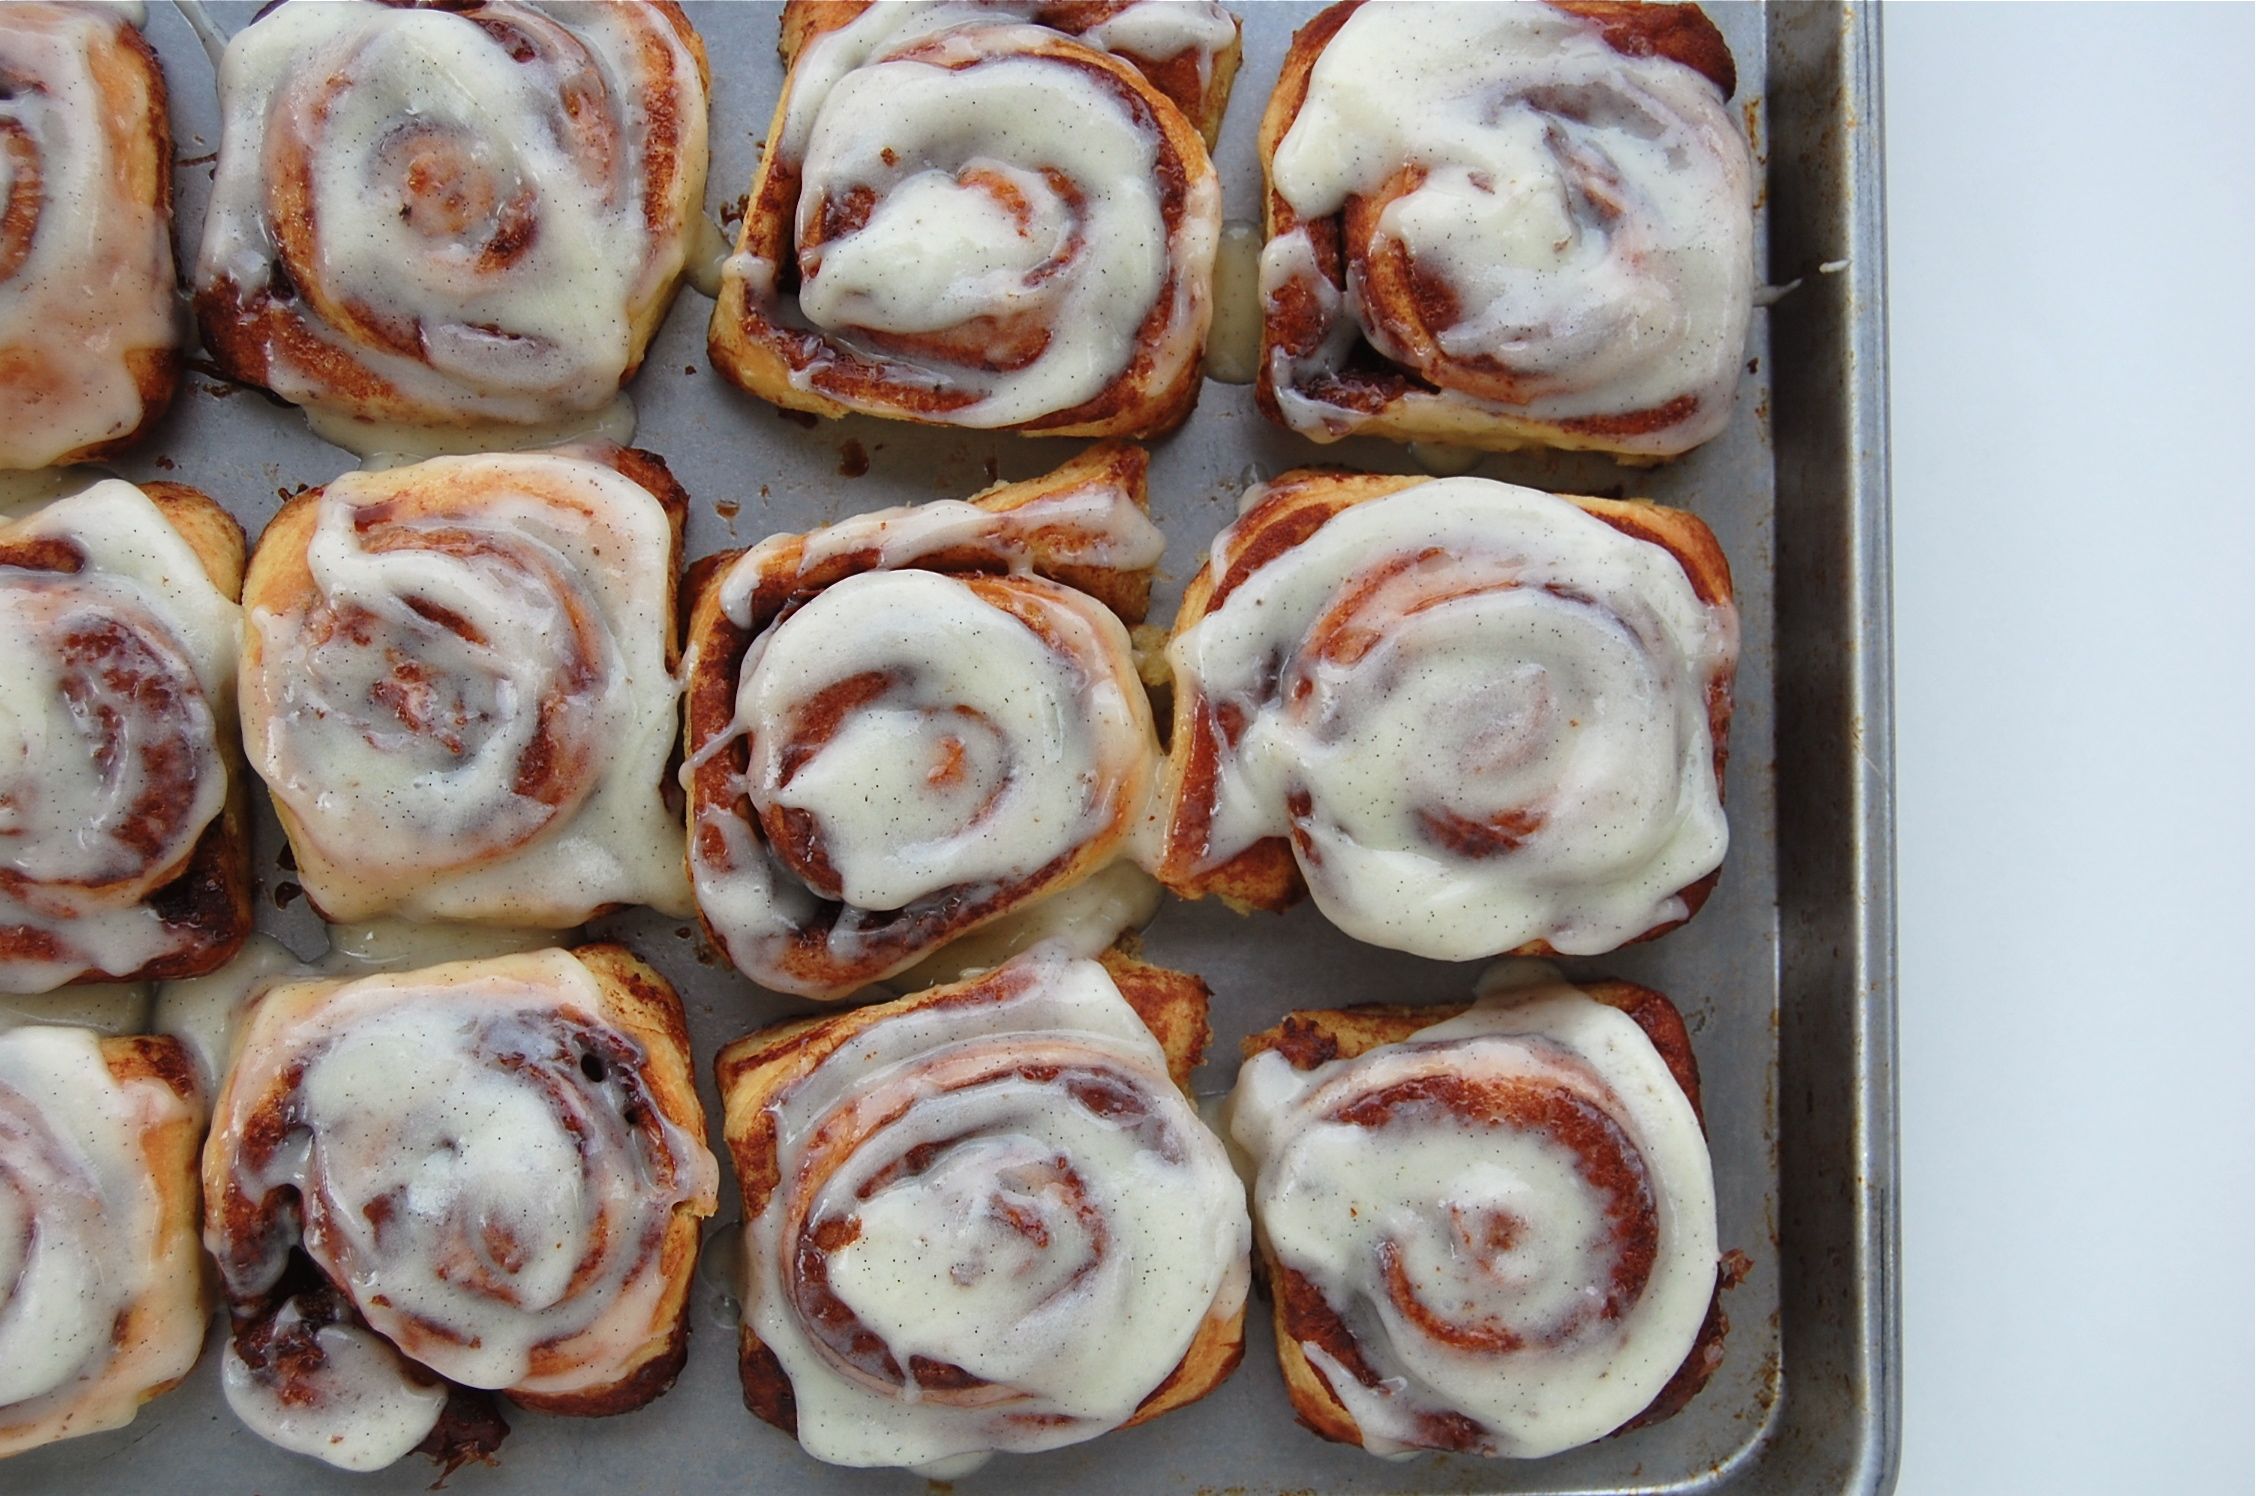
Glaze the buns:
– Whisk together all of the glaze ingredients until smooth.
– When the cinnamon rolls are finished baking, you can decide whether to glaze them warm or after they’ve cooled. One at a time, invert the buns onto a wire cooling rack. Spread the glaze onto them, you will have more than enough.
Homemade Doughnuts! Krispy Kreme style!
Now I’ve really gone and done it. I knew it was a slippery slope, but how could one resist? I’ve made doughnuts before, with mixed success. I’ve probably been the most happy with my apple fritters, but apple fritters are basically in their own category. And ricotta zeppoli, I think I’ve nailed that one. But a perfectly executed, simple glazed doughnut, now that’s a challenge. It seems to me that there are two camps of thought on the topic of glazed doughnuts (we’re talking “raised” doughnuts here), and they revolve around Krispy Kreme: you’re either with them or against them. I know this is a controversial opinion, but having grown up in the South where Krispy Kreme reigns, where staring bug-eyed at those little discs moving along their little frying oil river after church on Sunday mornings was a pinnacle experience, I am a devoted fan. Since moving to the west coast, they are much less ubiquitous, and not having a car for 14 years kept me from seeking them out, which surely kept my waistline in check. All that changes today, because now I can make them myself. Very, very dangerous indeed. I suspect I’ll be renewing my gym membership this week.
For those nervous about doughnuts, let me assure you, they are worth it. While there is a lot of waiting time, the amount of time you’re actually making effort is quite minimal. So while they’re probably not a weeknight dessert (unless your workday ends quite early), they are perfect for a day when you have other things going on in the house. You can check in on them periodically, and once you get the system down, they practically make themselves! OK, not that easy, but you know what I mean.
I started with a very wet and sticky dough.

I let it rise until it doubled in size.

Then I rolled it out and stamped pretty little shapes in it.

I let those pretty rings rise again, until perfectly puffed.

And then I fried them and glazed them. I am very excited about the vanilla glaze. Oh yes. My chocolate glaze, well, it needs some work. And since I need to take a breather from having doughnuts around ALL THE TIME, I will get back to that another day. For now, the glazed doughnut, use it wisely.

GLAZED DOUGHNUTS RECIPE:
(Makes 10 – 12 doughnuts)
2 tsp active dry yeast
1 cup whole milk
12oz bread flour, divided
3 egg yolks
2 TBSP superfine sugar
1/2 tsp salt
1/2 vanilla bean
1/4 tsp vanilla extract
2 oz butter
vegetable oil
– Heat the milk to 100 degrees. I just pop it in the microwave for about 20 seconds. Stir in the yeast until it is dissolved. Transfer to a medium bowl and add 5 1/2 oz of the bread flour. Stir until it forms a smooth paste. Cover the bowl in plastic to prevent drying out and place in a warm spot to rise. The inside of a gas oven is a great place, oven turned off of course.
– When the paste has doubled in size (about an hour, depending on the temperature of your house, it will now look more like a sponge), add it to a kitchenaid mixer fitted with a paddle attachment. Add the egg yolks, superfine sugar and salt and mix on low speed until smooth.
– Split and scrape the seeds from the vanilla bean and add to a small pot with the butter and vanilla extract. Heat just until melted. Add to the dough in the kitchenaid mixer and mix on low speed until smooth. With the mixer running, slowly add the rest of the flour, sprinkling in at the side. Keep mixing until it just comes together into a smooth dough. It will be quite wet and sticky, but should be able to hold together as one “lump” of dough. If not, add a bit more flour, one TBSP at a time.
– Brush a large bowl lightly with vegetable oil. Place the dough in the bowl and cover with plastic wrap. Place in a warm spot to rise.
– Once the dough has doubled in size, pop it in the fridge for 15 minutes. This will make it easier to roll out.
– On a well-floured surface, gently roll out the dough to about 3/8” to 1/2” thickness. Use a cutter to stamp out whatever shapes you like. Place the stamped dough on a parchment lined sheet pan, cover with plastic and allow to rise again in a warm spot.
– Once the doughnuts are almost doubled in size, begin heating 1 1/2 to 2 inches of vegetable oil in a large pot. When the the oil reaches 360º start frying the doughnuts in batches. Fry them until golden brown on each side, the total frying time will be under 2 minutes. Use tongs to flip and retrieve them.
– Allow to drain on a wire rack over a sheet tray. While still warm, drizzle with glaze. If making chocolate doughnuts, wait until they have cooled and then dip half in the chocolate glaze.
Glaze:
1 1/2 cups powdered sugar
1/2 tsp vanilla extract
1/8 tsp salt
1/4 cup milk
– Combine all ingredients in a small bowl and stir until smooth. If it is lumpy, pour it through a fine mesh strainer.
Homemade Pork Buns!
Dear Pork,
We meet again. This time things got intense. As per usual I was dabbling in vegetarianism, reading books like “Animal Factory” and “Eating Animals” and having thoughts like “I just can’t keep eating meat”. Then I bought a groupon for Barnes and Noble. Dammit, I blame it on them. I was perusing the shelves, looking for just the right present to myself (I’ve imposed a cookbook moratorium on myself so this was a big day). Then I saw it. A book I’ve been dreaming about since I read about it online: “Asian Dumplings” by Andrea Nguyen. My Lord, it’s like she wrote a book just for me. I snatched it up and stayed awake that night reading it cover to cover. But I’ve been so busy with my new business that I just didn’t have time to make anything from it for months! But finally, I got a day off. And what did I do? I made pork buns. Sticky, messy, slightly sweet, cracktastic pork buns.
First I marinated you in a magical sauce with all kinds of delicousness: five spice powder, hoisin sauce, honey, soy sauce and much more.

Then I laid you on a rack to go in the oven.

And roasted you until you were all glossy and charred and happy looking.

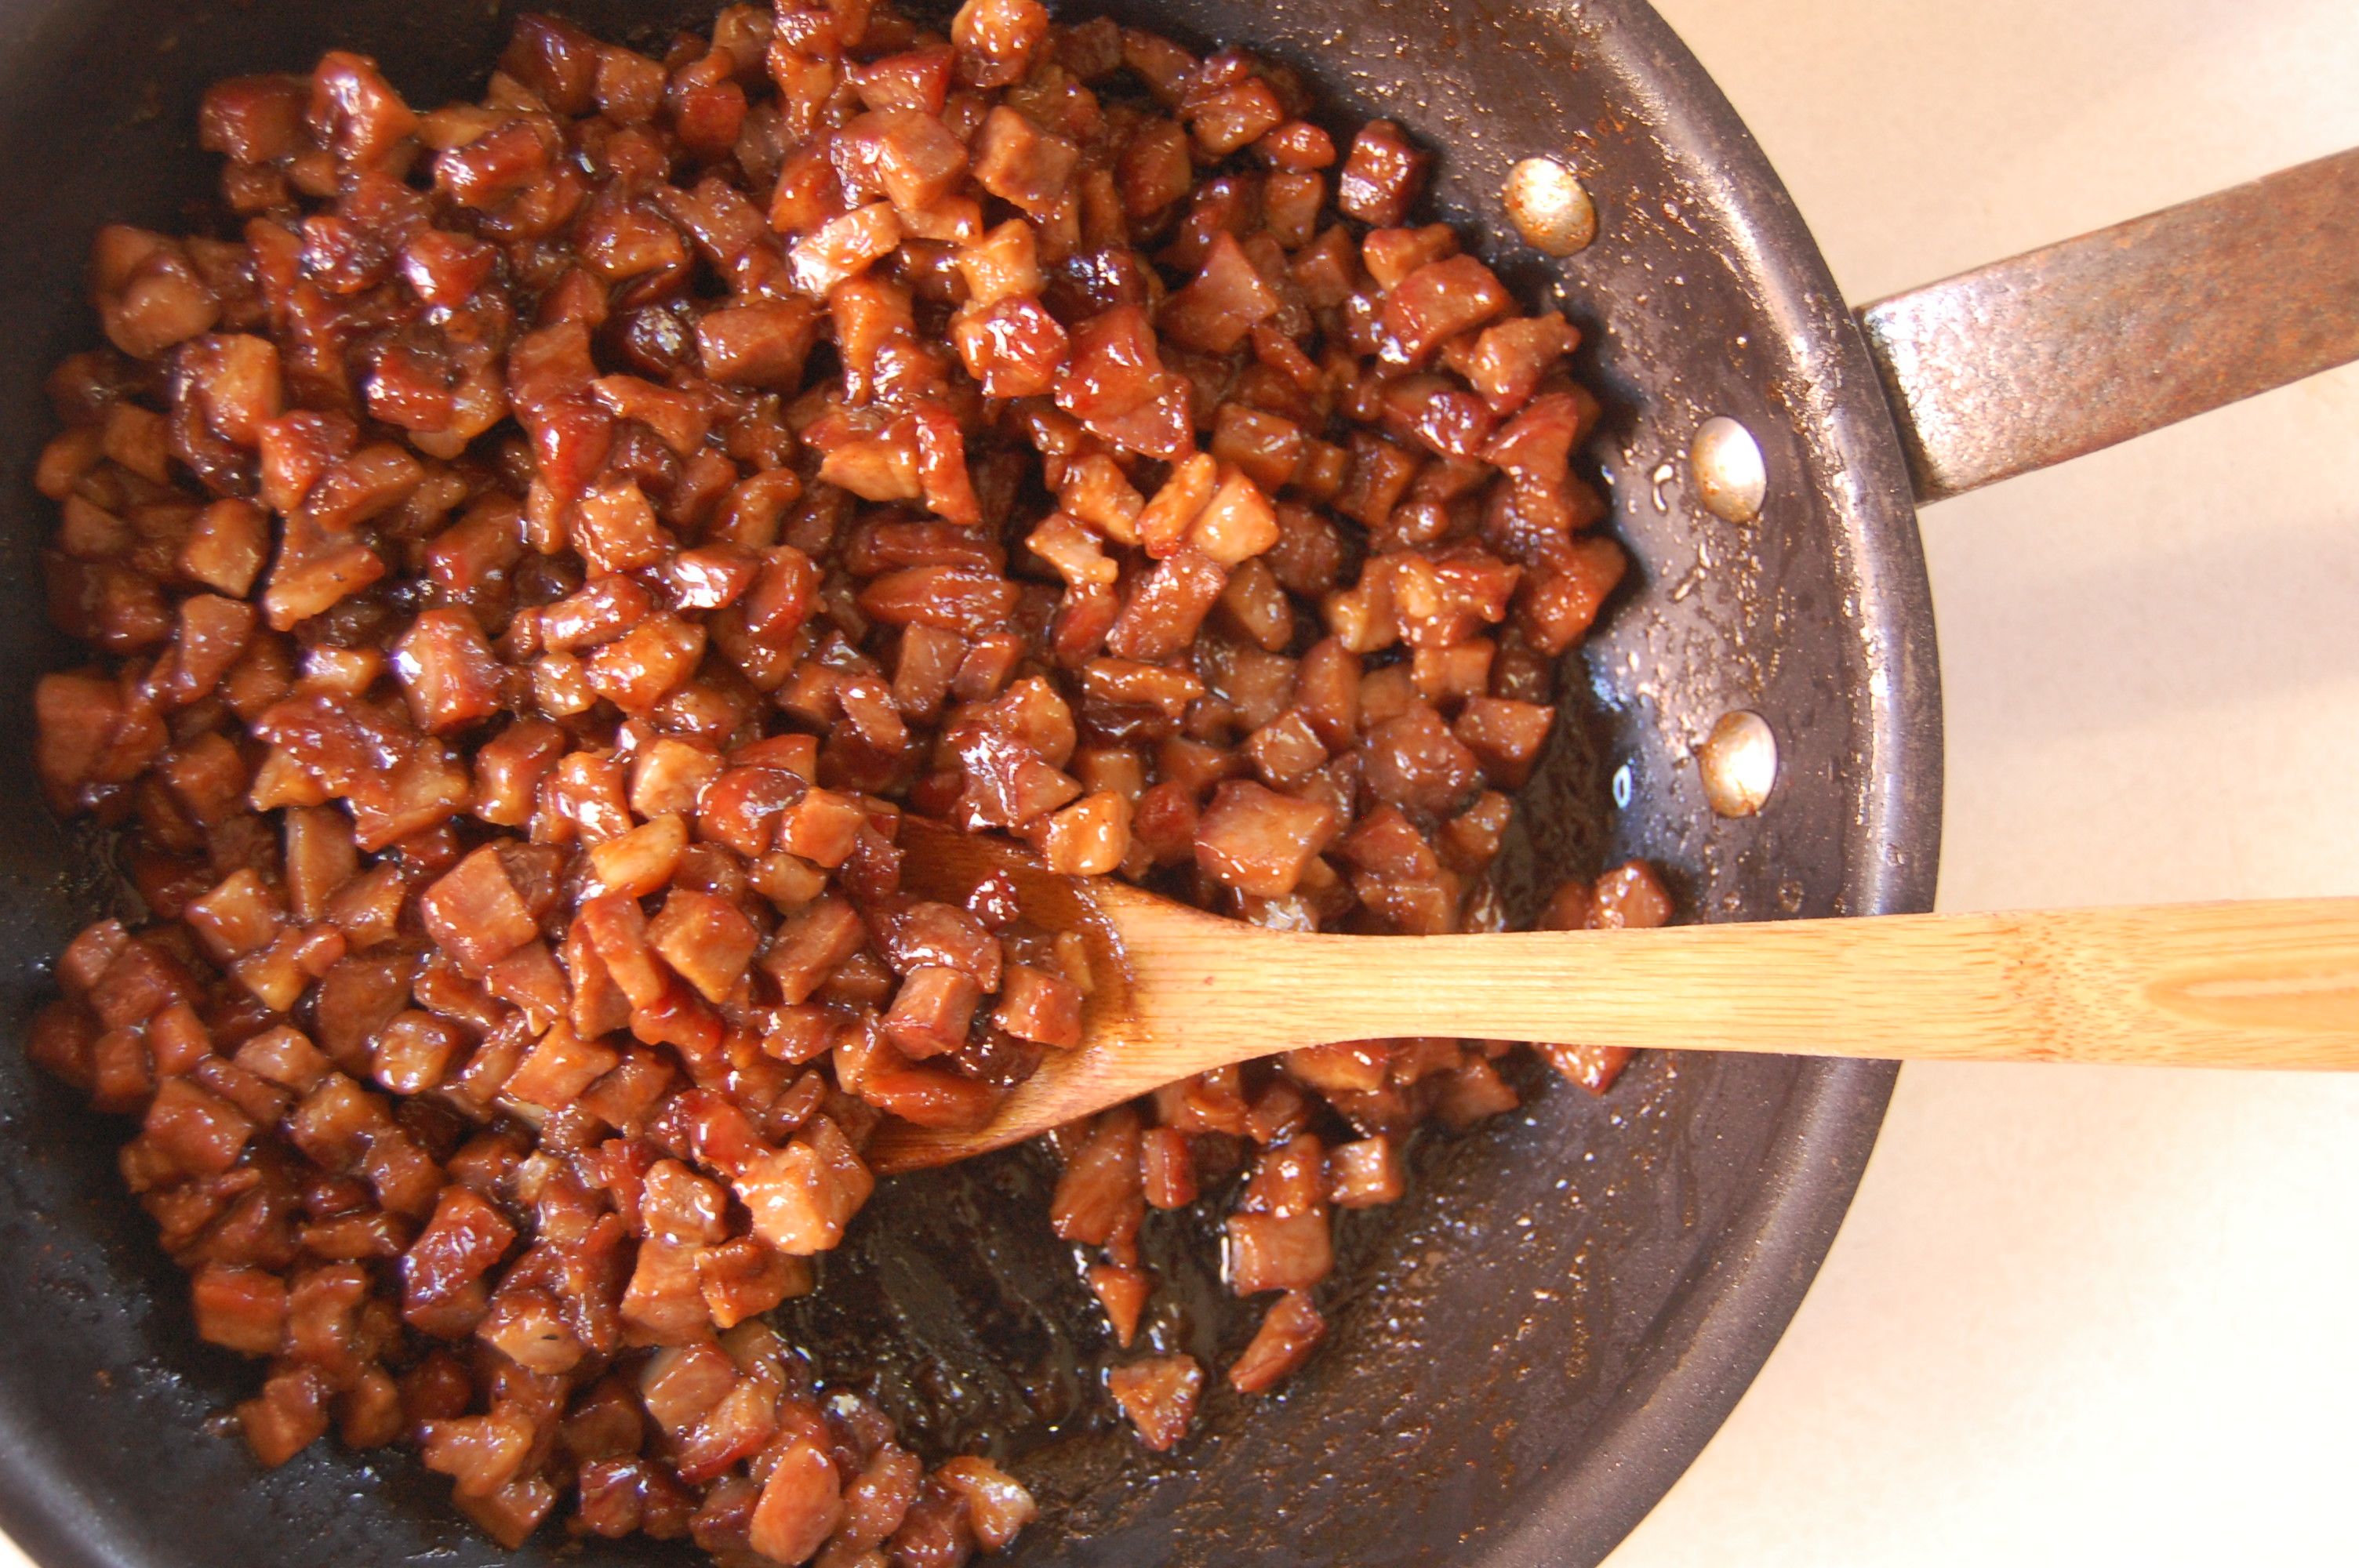
From there I took it a step further. I chopped you up into itty pieces and cooked you with more delicious sauciness.

While you waited patiently, I made a dough, a dough not too different from my favorite hamburger bun dough. I cut that dough into chunks.

And then I encased you in that dough, giggling with every pleat.

You made adorable dumplings.

I let your dough rise until soft, and then I roasted you again. I pulled you from the oven and glazed you with honey. And then me and friends devoured you. Oh my, sweet pork, you do continue to surprise me. Thank you, for setting me straight again.

PORK BUNS RECIPE (Andrea Nguyen):
Char Siu Pork:
1 lb bonelss pork shoulder
1 big clove garlic
1 1/2 TBSP sugar
1/4 + 1/8 tsp five spice powder
2 TBSP 3/4 tsp hoisin sauce
1 1/2 TBSP honey
1 TBSP + 1/2 tsp Shaoxing rice wine
2 1/2 TBSP soy sauce
1 1/2 tsp sesame oil
– Cut the pork into strips that are 1 1/2” thick.
– Mix the rest of the ingredients in a bowl large enough to fit the pork, this will be the marinade. Remove 1/3 of the marinade to a small bowl and store in the fridge. This will be used later on for basting the pork as it roasts. Toss the pork in with the rest of the marinade to coat evenly. Cover and refrigerate for 6-8 hours, turning the pork 2-3 times.
– Remove the pork and reerved marinade from the fridge and let sit at room temperature for 45 minutes. Preheat the oven to 475 degrees. Line a baking sheet with aluminum foil and place a roasting tack on top. Put the prok on the rack, leaving an inch between the pieces for heat circulation. Discard the used marinade.
– Roast for 30 minutes, basting both sides of the pork with the marinade every 10 minutes. Flip the pieces over at every interval. T]he pork is done when it is glazed and slightly charred, Remove from the oven. Let the meat rest for 10 minutes before using.
Pork Bun Filling:
1 TBSP sugar
1 pinch of salt
1 pinch of white pepper
1 TBSP soy sauce
2 tsp oyster sauce
1 TBSP water
2 tsp canola oil
2 scallions (white and green parts), chopped
1/2 pound Char Siu Pork, diced
1 tablespoon Shaoxing rice wine
1 1/2 TBSP cornstarch dissolved in
2 TBSP water
– To make the flavoring sauce, combine the sugar, salt, white pepper, soy sauce, oyster sauce, and water in a small bowl. Stir to dissolve the sugar and set aside.
– Heat the oil in a medium skillet over medium heat. Add the scallions, and cook, stirring constantly, for about 30 seconds, or until aromatic and slightly softened. Add the pork and combine well. Add the flavoring sauce and cook, stirring frequently, for about 2 minutes, or until the pork is heated through. Meanwhile, add the rice wine to the dissolved cornstarch. When the pork is hot enough, add the wine and cornstarch mixture. Cook for another 30 seconds, stirring constantly, until the mixture comes together into a mass that you can mound. Transfer to a bowl and set aside to cool completely before using. (The filling can be prepared up to 2 days in advance, covered with plastic wrap, and refrigerated. Return to room temperature before using.)
Dough:
10 TBSP whole milk
4 TBSP butter
2 tsp rapid-rise (instant) dry yeast
2 1/2 TBSP lukewarm water
1 large egg
2 1/2 TBSP sugar
12 1/2 oz All-purpose flour
1 large egg, lightly beaten
2 TBSP honey mixed with 1 TBSP warm water
– For the dough, melt the butter with the milk in a saucepan over medium heat. Set aside to cool for about 5 minutes, or until warm (about 110°F).
– Put the yeast in small bowl, add the water, and set aside for 1 minute to soften. Whisk in the milk mixture and the egg to blend.
– Combine the sugar and flour in a food processor. Pulse two or three times to blend. With the machine running, pour the yeast mixture through the feed tube in a steady stream. After a sticky mass of very soft dough forms, about 5 seconds, continue processing for 45 to 60 seconds to form a smooth, slightly sticky dough that mostly cleans the bowl. The finished dough should stick a bit to your finger when pressed. Alternatively, to make the dough by hand, combine the sugar and flour in a large bowl. Make a well in the center and pour in the yeast mixture. Slowly stir with a wooden spoon to work in all the flour. (Add water by the teaspoon if this doesn’t happen with relative ease.) Keep stirring as a ragged, soft mass forms. Then use your fingers to gather and pat the dough into a ball. Transfer to a work surface and knead for about 5 minutes, or until smooth, fingertip soft, and slightly elastic. (You should not need any additional flour on the work surface if the dough was properly made. Keep kneading and after the first minute or two, the dough should not stick to your fingers. If it does, work in a sprinkling of flour.) Press your finger into the dough; it should spring back, with a faint indentation remaining.
– Regardless of the mixing method, lightly oil a clean bowl and add the dough. Cover with plastic wrap and put in a warm, draft-free place (for example, the oven with the light on) to rise for about 45 minutes, or until nearly doubled.
– Line 2 baking sheets with parchment paper before beginning to assemble the buns.
– Remove the dough from the bowl and put on a lightly floured surface. Knead it a few times, then cut it in half. Cover one-half with plastic wrap or an inverted bowl to prevent drying. Roll out the dough into a 12-inch log, and then cut it into 8 or 16 pieces for medium or small buns, respectively. (Halve or quarter the log first to make it easier to cut even-size pieces. The tapered end pieces should be cut a little longer than the rest.) Lightly roll each piece between your hands into a ball and then flatten each one into a 1/4-inch-thick disk. Use a wooden dowel-style rolling pin to roll the pieces into circles, about 2 1/2 inches in diameter for small or 31/4 inches in diameter for medium buns. The rim should be thinner than the center; keep a 1-inch-wide belly. The finished circle will rise as it sits. Lay the finished circles out on your work surface, lightly dusting their bottoms with flour if you fear they will stick.
– To form a bun, hold a dough circle in a slightly cupped hand. Use a spoon or fork to center about 2 teaspoons of filling for small buns, or about 4 teaspoons of filling for medium ones, on the dough circle, pressing down very gently and keeping about 1/2 to 3/4 inch of the dough clear on all sides; your hand will automatically close slightly. Use the thumb of the hand cradling the bun to push down the filling while the other hand pulls up the dough edge and pleats and pinches the rim together to form a closed satchel. Pinch and twist the dough closed at the end. Place the bun pleat side down on the prepared baking sheet. Repeat with the remaining dough circles, spacing them 11/2 inches apart on the baking sheet. Loosely cover with plastic wrap or a kitchen towel. Set in a warm, draft- free place (for example, the oven with the light on) for 30 minutes to rise. Meanwhile, work on the other dough half to form more buns.
– To bake the buns, about 10 minutes before the rising time is over, position a rack in the middle of the oven and preheat to 350°F. (Let the buns finish rising at room temperature if you’ve had them in the oven.)
– Bake one baking sheet at a time, brushing the top and side of each bun with the egg right before baking. Bake small buns for about 14 minutes and medium buns for about 18 minutes, or until a rich golden brown; the cooked buns sound hollow when tapped on the bottom. Remove them from the oven, set on a rack, and let cool for 5 minutes.
– Brush the honey mixture on the buns for a sweet-glaze finish that will also soften the crust. Enjoy warm and out of hand. Refrigerate left- over buns for up to a week and reheat at 350°F for 8 to 10 minutes, until hot. When making the buns in advance, wait to brush on the glaze until after you’ve reheated the buns. These buns may also be frozen for up to a month. Thaw them completely before reheating.
A dinner roll to be thankful for.
Oh Thanksgiving. What a fantastic day. A day fully devoted to food. And in my world, slippers and board games. I’ll admit that there were some culinary blah moments: leaky pie crust, not quite right brussels sprouts, a realization that even spending a lot of money on a locally raised heritage bird does not make turkey taste better than the side dishes. But there were some super happy moments: playing the train game, cauliflower caramelized in browned butter with pears and hazelnuts, and most important – Parker House dinner rolls. Yes, just like July 4th.
It was one of those serendipitous moments a month ago, when I was debating about what to serve with Thanksgiving dinner – my usual biscuits, a loaf of brioche, a nice crusty bread. My Saveur magazine came in the mail and I landed on the article where Tom Colicchio shares his recipe for Parker House rolls. I was immediately sold. I grew up on delicious rolls, or at least I think I did. No one actually made them from scratch in my family, so I’m not sure where I got the flavor memory of a delicate, buttery, yeasty roll. But it’s in there and that recipe was tickling that memory. And, my people, they were GOOD. So good in fact, that I made them again the day after Thanksgiving, to make sure I wasn’t blinded by Thanksgiving buffet hysteria.
First I made the dough. I let it rise in the warmest corner of my house and then shaped it into little balls.

I brushed the little balls with clarified butter and let them rise some more, until puffed and filling the pan.

I brushed them with even more butter and baked them until golden. While still hot I brushed them with…even MORE butter and sprinkled them with sea salt.

And then me and John started eating them, one by one. I think these little guys will find a happy home on my Christmas dinner menu…

PARKER HOUSE ROLLS RECIPE (Tom Colicchio, printed in Saveur magazine):
3/4 cup milk, heated to 115°
1 tsp active dry yeast
1 tsp barley malt syrup (I was out and used brown rice syrup)
2 cups flour
1 1/2 tsp salt
1¼ oz unsalted butter, softened
¼ cup clarified butter
Fleur de sel, to garnish
– Stir together the milk, yeast, and malt syrup in a large bowl and let sit until foamy, about 10 minutes. In a medium bowl, whisk together flour and salt. Add to the milk mixture along with the softened butter and stir with a wooden spoon until a dough forms. Transfer to a lightly floured work surface and knead until smooth, 5–6 minutes. Transfer dough to a bowl that has been lightly greased with clarified butter and cover with plastic wrap. Let sit until nearly doubled in size, about 1 hour. Uncover and punch down dough. Cover and let sit until puffed, about 45 minutes.
– Heat oven to 350°. Portion dough into sixteen 1 1/2″-diameter balls, about 1.1 oz each, and transfer to a greased 8″ cast-iron skillet or 8″ x 8″ baking pan, nestling them side by side; cover loosely with plastic wrap and let sit until doubled in size, about 2 hours. Brush with clarified butter and bake until puffed and pale golden brown, 20–22 minutes. Transfer to a rack and brush with more clarified butter; sprinkle each roll with a small pinch of fleur de sel and serve warm.
NOTE: They definitely want to be eaten within the first few hours of being baked, straight from the oven if you can manage.
The Hottest Buns in Town
Whew. My first 4th of July in Seattle and wow, it was fun. Old friends in town, new friends coming over, lots of food and fireworks and slap scrabble. It was our first party in a Seattle and I’m so glad we did it. But WHEW! There was cooking going on in my tiny kitchen, SO much cooking. Four pies were baked: cherry almond, black raspberry (I didn’t even know such a thing existed until this week!), strawberry rhubarb custard and blueberry lattice. A gigantic cabbage salad with a peanut dressing. More baked beans than I think anyone wants to see in one place. And pulled pork sandwiches. I wanted pulled pork sandwiches badly. Having never made them, I turned to the Lee Bros. for their recipe. Did I mention that we’re talking about 13 lbs. of pork?

It was an intimidating amount of meat. And while the flavor was fantastic (think tomatoes, apple cider vinegar, cane syrup), I have to fault the Lee Bros. for tricking me into thinking that pork shoulder would get as meltingly tender as I wanted in the amount of time they claimed. I now know that pulled pork wants at least 8 hours if you’re on the low-oven-roasting path. It was a close one and I have Sam and Brandon to thank for pulling a delicious dish out of the mess I started, because by the time we realized that the pork needed several more hours of roasting to liquify all that fat, we had already eaten all of the salads, sides and pies in the house. Not to mention the copious amounts of wine I had befriended by then. Thank God for chef friends who are more than competent at drunken cooking!

At some point John made a diagram about when to stop cooking the meat. It was a question of quality vs. time, measuring the increasing quality of the pork as it cooked and our changing expectations relating to our hunger levels. I swear it was genius at the time.

By now you’re maybe thinking “Gee Brandi, your last 3 posts are about meat. What gives?” It’s true, we’ve been awfully carnivorous this month. Which is why I will now turn my attention to the real reason I’m here talking about a pulled pork dish that I can’t even begin to explain how it came to be. My point? The bun. I will admit that when I mentioned to some people that I wanted to make my own buns, there was some skepticism. It was too much work, they said. There are perfectly good buns out there that somebody else made. But I just didn’t buy it. I mean, EVERYONE has a pulled pork recipe up their sleeve (well, except me apparently), but when a girl really wants to take it to the next level, then it’s the bun that gets people’s attention. So I made them anyways. Even though with 4 pies (3 requiring pre-baked crusts), an ungodly amount of beans, and half a day’s worth of pork, we were totally out of oven space.
And you know what people talked about the most at the BBQ? Those sexy little buns of mine.
There were lots of them, rising all over the house.

They were glazed with egg and sprinkled with seeds.

And then baked until they were puffed and golden.

I don’t care how much effort they were (not THAT much really), I’m never buying a bun from the store again.

And just so no one thinks I’ve stopped caring about dessert, here’s a blueberry lattice pie that was devoured in about 15 minutes flat.

LIGHT BRIOCHE BUNS RECIPE (adapted from Comme Ça restaurant, printed in the New York Times):
3 TBSP warm milk
2 tsp active dry yeast
2 1/2 TBSP sugar
2 large eggs
3 cups bread flour
1/3 cup all-purpose flour
1 1/2 tsp salt
2 1/2 TBSP unsalted butter, softened
Sesame or poppy seeds (optional)
1. In a glass measuring cup, combine one cup warm water, the milk, yeast and sugar. Let stand until foamy, about five minutes. Meanwhile, beat one egg.
2. In a large bowl, whisk flours with salt. Add butter and rub into flour between your fingers, making crumbs. Using a large spoon, stir in yeast mixture and beaten egg until a dough forms. Knead until smooth and elastic, about 8 to 10 minutes. You can either transfer the dough to a clean surface for this or knead it right in the bowl. It’s a touch sticky, but resist the urge to add more flour.
3. Shape dough into a ball and return it to bowl. Cover bowl with plastic wrap and let rise in the fridge. This long proofing time will make a nicer flavor and also make it easier to shape while cold.
4. Line a baking sheet with parchment paper. Divide the dough into 8 equal parts. Gently roll each into a ball and arrange two to three inches apart on baking sheet. Cover loosely with a piece of plastic wrap lightly coated in nonstick spray and let buns rise in a warm place for one to two hours, until they almost double in size.
5. Set a large shallow pan of water on oven floor. Preheat oven to 400 degrees with rack in center. Beat remaining egg with one tablespoon water and brush some on top of buns. If desired, sprinkle with seeds. Bake, turning sheet halfway through baking, until tops are golden brown, about 17-18 minutes. Transfer to a rack to cool completely.
Just Another Dirty Southern Brunch
Sometimes I just have these cravings…Southern cravings. They come on fast and hard and suddenly I just NEED to recreate something from my younger days. Yesterday I was entertaining friends for brunch. The night before, I was flipping through cookbooks, trying to find something complex and interesting to make. I was feeling particularly uninspired until I passed over a recipe for angel biscuits, which are basically biscuits leavened with yeast along with the more traditional baking powder. My mouth instantaneously started drooling as I recounted the feathery light biscuits the South is known for. And then there was nothing else I could possibly cook. There was no complicated quiche, no perfectly stacked benedict and certainly no fancy-pants pastry that could substitute for that biscuit. Thus, it was on.
And of course, where there’s biscuits, there’s bacon gravy.

But the biscuits. Did I mention they have yeast in them?

And of course, lard. Yes, I keep a block of lard in my freezer.

I rubbed the lard with some butter into my flour mixture.

And then poured in the yeast and some buttermilk.

I mixed (but just barely) that into a dough, pressed it out and stamped out my biscuits.

Then I let them rise by the fireplace until they were nice and puffed.

And then baked them until they had a nice crispy crust. And oh boy, they were yummy. Pretty much the perfect biscuit. So good that it almost seemed like a waste to pour gravy all over them. Not that that stopped me.

But could I stop with the biscuits and gravy? No. I wanted more. I wanted dirty. I wanted pimento cheese. Chances are that if you live on the wrong (or right) side of the mason-dixon line, you’ve never heard of such a thing. Let me tell you, it is kinda gross. And delicious. Think cheddar. Mixed with roasted peppers (In the South they have these jarred pimentos, I have no idea what makes those so special or why you can only get them there). And mayonnaise. Oh yes, I went there.
But since I DO have my limits, I at least made my own mayonnaise. Because that jarred stuff gives me the willies.

In a big bowl I threw in shredded cheddar, finely diced roasted red peppers, paprika, cayenne and some black pepper.

And stirred in my mayonnaise. Like I said, Dirty. It was not a brunch for the delicate eater, and I suspect I actually scarred Tessa (even though I totally caught her dipping a finger in the pimento cheese when she thought no one was looking), but it was worth the heartburn.

ANGEL BISCUITS RECIPE (adapted from Edna Lewis):
1 package (1/4 oz) active dry yeast
1/4 cup warm water
2 cups buttermilk, at room temperature
5 cups all-purpose flour
1/4 cup sugar
1 TBSP baking powder
1 tsp baking soda
1 TBSP salt
4 oz lard, cold
4 oz butter, cold
melted butter for brushing the biscuits
– Dissolve the yeast in the warm water, let stand for 5 minutes. Stir in the room temperature buttermilk.
– Put the flour, sugar, baking powder, baking soda and salt i a large bowl. Mix thoroughly. Using your fingers, rub in the lard and butter, being careful to keep large flat pieces.
– Stir in the yeast and buttermilk and mix until just blended.
– Turn dough onto a lightly floured surface and knead a few times, to make smooth. Roll to a thickness of 1/2″ and stamp out biscuits.
– Place biscuits on a parchment lined baking sheet. Cover lightly with plastic wrap and let rise in a warm place for 45 minutes.
– Brush tops with melted but and bake in a preheated 450 oven for about 12 minutes, until golden brown.
Pretzels!
Today I learned something important: Pretzels can be really awesome. Homemade pretzels have been on my list for a while now, and I just kept putting them off. To be honest, I’ve never been a huge fan. And, well, my jaw doesn’t work so good sometimes and pretzels can be a real workout for the ole temporomandibular joint. But yesterday I made them. And they changed everything I’ve ever thought about pretzels. Seriously, I thought that I would take a nibble and then let John work his way through the pile. But after one bite I was ready to fight to the death for my second pretzel. Needless to say, these pretzels didn’t last 8 hours before being claimed by loving tummies. So I now know: T\there is not much better than a hot-out-of-the-oven pretzel, and I thank Sherry Yard a thousand times for sharing this recipe in her cookbook.
And did I mention they’re pretty simple to make? You start out with a dough. 
After the dough proofed I flattened it into a rectangle and chopped it into 8 pieces.

Then came the fun part: shaping. I think I got a tad carried away with the kneading, thinking gluten development was essential for the classic chewy pretzel. It made shaping them into ropes a bit trying, but eventually they got there. It’s important to get the dough fairly thin, because it’s going to be a lot thicker when you’ve finished.

I let the shaped pretzels proof a bit more on some oiled parchment.

Then I boiled (actually simmered) them. I think what made this recipe awesome was the amber beer in the simmering liquid, you could really taste it in the final pretzel!

I put them back on the parchment, brushed them with oil and sprinkled them with coarse sea salt.

Then into the oven they went until they were nice and toasty. And let me tell you, absolute perfection. I highly recommend this recipe to the pretzel fans and skeptics out there.

RECIPE (adapted from Sherry Yard):
Makes 8 pretzels
Dough:
1 1/4 tsp active dry yeast
1/2 cups warm water
1/4 cup buttermilk
2 TBSP light brown sugar
3/4 tsp sugar
1 1/2 tsp vegetable oil, plus more as needed (I used olive oil)
2 cups bread flour
1 1/2 tsp salt
Simmering Liquid:
2 quarts water
1/4 cup amber beer
1/4 cup baking soda
1/4 cup packed light brown sugar
vegetable oil
2 TBSP coarse sea salt
Make the dough:
– In a measuring cup, dissolve the yeast in the water and let sit for 5 minutes, or until cloudy. Add the buttermilk, brown sugar, sugar, and vegetable oil and mix well.
– Place the flour and salt in a bowl. Add the liquid mixture and knead until smooth.
– Brush a large bowl with vegetable oil. Scrape out the dough and place in the bowl. Cover with plastic wrap and let sit at room temperature for 1 hour.
– Line 2 half sheet pans with parchment paper and brush with oil. Lightly oil your work surface and your hands. Remove the dough from the refrigerator and press into a 6-inch square. Cut into 1 1/2 by 3 inch rectangles. One at a time, shape each piece into a pretzel. (Cover the pieces you aren’t working on with plastic.) Roll each piece out into a 24-inch long rope. Shape into a U, then crisscross the ends halfway up, twist them together like a twist-tie, and pull the legs down over the bottom of the U. Place the shaped pretzels onto the lined baking sheets. Cover with lightly oiled plastic wrap and allow to rise for 30 minutes, or until not quite doubled.
– While the pretzels are rising, place racks in the upper and lower thirds of the oven and preheat the oven to 450 degrees F. Cut the parchment the pretzels are on into squares to facilitate lifting and transferring the pretzels into the water bath.
– In a 10-inch-wide stainless-steel pot, combine the water, beer, baking soda, and brown sugar and bring to a simmer. Two at a time, lift the parchment square with pretzel and carefully reverse the pretzel off the parchment into the simmering water. Cook for 10 seconds and flip, using a skimmer or slotted spoon. Cook for another 10 seconds, and with the skimmer, lift above the pan to drain. Then transfer back to the baking sheets, rounded sides up. Brush with vegetable oil. Dust with coarse salt.
– Bake, switching the sheets from top to bottom and rotating from front to back halfway through, for 15 minutes, or until the pretzels are chestnut brown. Remove from the oven and serve warm. Be sure and check the bottoms, mine got a little toasty!
Raspberry Jammin
Sometimes I just shouldn’t be allowed near the farmer’s market. Yesterday was so pretty and sunny, it made the raspberries so shiny and pink…how could anyone refuse buying a whole flat? I was so giggly riding the bus home thinking about all the projects I was going to tackle. First up though: raspberry jam. Because it’s my fave…

It’s my first time making raspberry jam, and it’s super easy! I generally go with almost equal parts sugar to fruit (by weight), but with just a tad less sugar. I heated it on low for 10 minutes, to break down the berries a bit and dissolve the sugar. Then I boiled it for about 15 minutes, until it appeared set.

I put it in sterile jars and popped it in the fridge to cool and finish setting, and then got to work on some whole wheat english muffins to spread it on…yummmm…

We are now officially overflowing in homemade jam. But I can’t stop making it.
RECIPE – Raspberry Jam:
2 lbs raspberries
1.75 lbs sugar (but this really depends on how tart your berries are)
– Heat in pot on low for 10 minutes to dissolve sugar.
– Once dissolved, bring to rapid boil and cook for about 15 minutes (this time changes depending on your quantity of berries), or until set.
– Immediately pour into sanitized jars and seal.
RECIPE – English Muffins (adapted from Nick Malgieri):
1 1/2 tsp instant yeast
2 cups all-purpose flour
3/4 cup whole wheat flour (you can just use all-purpose if you like)
2 tsp salt
1 cup warm water (about 110 degrees)
4 tbsp (2 oz) butter, melted
1 tbsp honey
cornmeal for pan
– Whisk together flours, instant yeast, and salt in bowl.
– Mix together warm water, melted butter and honey in bowl. Add to flour mixture.
– Knead for about 5 minutes, until smooth and elastic. If too wet, add a bit more flour.
– Transfer to a floured baking sheet and pat down to be 1″ thick.
– Let chill, loosely covered with plastic in fridge for 15 minutes (or overnight if you wrap tightly).
– Roll out on floured surface to a bit more than 3/16″ thick. Use a round cutter to cut circles. Knead scraps together and place back in fridge to chill for another 15 minutes before rolling out again.
– Let circles rest at room temperature, covered with a towel, until almost doubled in size (the time depends on how hot your kitchen is, crank the heat up and it will go faster).
– When dough is ready, heat up cast iron skillet over medium – low heat. Sprinkle with cornmeal. Cook 1 muffin at a time until you get the heat right. Sometimes it takes a few rounds to get the heat right, but basically you want your muffin to cook through with 8-9 minutes on each side. I get paranoid and always place them in the oven for 10 minutes after cooking on the skillet.
– Let them cool and toast and dig in!
Bagels! and Cream Cheese!
When I see a sticky white bundle of cloth dangling in my kitchen, I know good things are coming.

As I have mentioned a few times, I do love a good cheese making session. Not that there’s much work on my end, I just like seeing that slow curding and draining process going on. Yesterday I made a yummy spreadable cream cheese, because, well, I’ve got some spreading to do. Me and Pantea are throwing a brunch party today, and while she will dominated with her delicious shirred eggs and veggies dish, my contribution will be loads of carbs and fat. Also known as bagels and cream cheese.
I’ve been wanting to make bagels forever, but it just seemed like one of those all day long projects, and then we would have stacks of bagels lying around. Since I’m way to obsessed with working my way through my vegetable box every week, AND I’ve been trying to ease John out of his carb addiction, it just seemed wrong. So I’ve been waiting, patiently, biding my time before pouncing on a good brunch invitation with my (hopefully) beautiful bagels.
So…we begin. bagels. I’m using the recipe from Peter Reinhardt’s “Bread Baker’s Apprentice”, Mostly because I think it’s a rad book, but also because it’s the only breadbaking book I own. I started with a sticky sponge (in breadspeak, a sponge is like a mini batch of your dough that you let rise for a bit before adding the rest or your ingredients, to add flavor) that I let hang out until it was all bubbly and magical cauldron looking.

Then I added the rest of the ingredients: flour, yeast, salt and malt syrup. Bagels are meant to be quite chewy, which requires a lot of kneading to build up all that gluten. And because they’re going to be boiled, bagels begin as a super stiff dough, which is easier to knead by hand, and can be a bit of work on your kitchen aid mixer. I started the kneading in my machine, but chickened out after 5 minutes or so when it started grunting. I finished the kneading by hand, basically kneading until I could stretch a piece of it out with my hands without it tearing.

Then I portioned it into future bagel sized chunks.

And poked little holes in them! Let us not discuss my shaping skills, they are…er…in progress.

Then I let my little guys rest for a bit, and rise until they could float in water. Once they were nice and floaty, they were ready to spend the night in the fridge.

I got up this morning pumped for my little bagel adventure! I cranked up the oven and brought a pot of water to boil. I boiled my bagels in batches for 1 minute on each side and then put them back on the sheet pan. I sprinkled them with sesame seeds, poppy seeds and sea salt while boiling the rest.

Then I baked them!

So Cute and most definitely brunch-worthy!

Balls Balls Balls
Another night, another 90210. But last night, in celebration of a few males joining the dinner/bad TV fest we decided to serve them a meal of balls. Balls of all shapes and sizes. I just bought a cookbook for Israeli food (yes, they DO have a national food, even if it was all stolen) and I was itching to try some circular things out.
It was an ambitious meal consisting of: lamb meatballs baked in a tahini sauce, homemade falafel, fried fish falafels, fresh baked whole wheat pita pockets, hummus, salad & fried cauliflower with a lemon tahini dressing. As you can see, that’s a lot of balls.
I was cooking at my friends’ house, and things starting going awry almost immediately. I dropped the fish balls (which actually worked out well because Misha, it turns out, is very allergic to seafood). About an hour before we planned to eat, I realized that they don’t own a food precessor, which made homemade hummus and falafel a bit…challenging. Thank you Truly Mediterranean for saving us on THAT one.
But the pitas were yum. And the fried cauliflower, perfect. Alas, that house is also where good food photography goes to die, so I am limited in documentation of our feast of the balls. But here are some pita photos!

I haven’t worked much with whole wheat yet, and this was my first time trying this recipe, so i was fairly happy with the results. They were tasty for sure.

But some of them didn’t expand to create a pocket (what’s up with that?), which meant we had to create our own pockets for stuffing. As always, I don’t think anyone cared besides me.

So we ate. And ate. And Misha REALLY ate. And then we feasted on donut balls (yes, I know how to drive a concept into the ground). And then all the guys CONVENIENTLY snuck away before 90210.


23 comments