The first jam of the summer
So you may have noticed that I’m not really cooking much these days. What can I say that I haven’t said in the last 4-5 posts? I miss cooking. I almost even miss stopping everyone from digging into piping hot yumminess so I can spend 5 minutes photographing it. Almost.
While I have been building and planting at The Pantry like a crazy little caffeinated person in overalls, I did manage to learn a few things about cooking while I was away from my computer. In Seattle we have a lovely jam-maker named Rebecca Staffel, who owns a company called Deluxe Foods. She’s kinda awesome (and she’s my neighbor, how lucky am I?!) and one day in May she let me hang out with her while she made her prize-winning gingered rhubarb jam. I felt like the luckiest girl in the Pacific Northwest for learning some of the tricks of the trade. Because while I’ve made a jam or two in my day, I am in no way a seasoned jam-maker. And rhubarb jam just seemed intimidating. I mean, rhubarb’s not even a FRUIT! But Rebecca broke it down for me and I went away giddy with plans for making my own batch of pink goodness. It’s been a crazy month, and I suspect it’s about to get crazier (our first event is in three weeks!). But we officially ran out of home-made jam in my fridge and well, if that’s not a kitchen emergency then I don’t know what is.
So I dropped everything yesterday and made some rhubarb vanilla jam. Whew.
I started by chopping up the rhubarb into teeny tiny bits. Like 1/8″ big bits. I rubbed the vanilla bean seeds into the sugar, and mixed the vanilla sugar (pod included) into the chopped rhubarb. I squeezed in the lemon juice and threw in the whole lemon chunks, which supplied some much needed pectin. I let the whole pile sit overnight in the fridge to get the juices out of the rhubarb.

The next morning I heated it all in my favorite pot. I kept it at a good strong simmer (is that just a boil?), stirring occasionally, until it reached its set point. This was my first time using a thermapen (Thanks for the tip on THAT one Rachel!), so I was feeling condident bringing the jam just to 220. Except then I got nervous that it wasn’t set and cooked it a bit more…hee. I ladled the hot jam into jars that had been boiling the whole time to get nice and germ-free. Once the jars of jam were lidded, I placed them on a tray and baked them for 10 minutes at 350 degrees. This is my first time “baking” them instead of processing them in boiling water, and I’m super excited at how easy it is (easy like, I can set a timer and run back to construction land and let John pull them out of the oven)!

We cracked open one of the jars last night for dessert. We just ate it with shortbread cookies and whipped cream and oh my, it is going to be a great summer.
Rhubarb Vanilla Jam Recipe:
2 lb 12 oz rhubarb, finely diced
2 lb sugar
1 vanilla bean
1 lemon, quartered and seeds removed
What I’m eating these days.
So I had lots of plans for this post. I was working on this homemade snickers bar recipe. A recipe that I was certain would make me a certified candy-making badass. Salty roasted peanuts, sweet sticky caramel, fluffy chocolate nougat — you know the drill. And then I learned that nougat is hard. Quite hard. Literally hard, mine was. I couldn’t even get a knife through it.
So that post will have to wait a while, because life is kicking me in the butt these days. Classes and dinner at The Pantry are selling (Yay!) and we FINALLY finished grinding the glue off of our concrete floor, a month-long project that was pushing my sanity level to its edge. Sheet-rock is going up as I type, which means cabinets, counters and tile are up next. SO! MUCH! FUN! But, all this fun, just doesn’t leave much time for the elaborate cooking experiments that I just adore (sniff).
So I’m here to share with you what I actually eat these days: salad. And lots of it. Tuesday was my birthday, and we had a potluck in the under-construction space, and John made my most favorite summer salad ever, a salad that pretty much defined 2010 for me: a cabbage peanut salad to be exact. I found the original recipe in the book Blue Eggs and Yellow Tomatoes and have slightly tweaked it to my taste (less sugar, less acid, more heat).
Obviously you start with a lot of cabbage.

While this salad is light on technique, it is like salad crack for me. You toss the cabbage with carrots, cilantro (LOTS of cilantro) and bell peppers and then mix in a spicy peanut sauce that I have to stop myself from eating straight from the bowl with a spoon. So maybe being a busy bee is a good thing? No time for desserts means more munching on salads, just in time for bathing suit season… Oh yeah, and did I mention you throw peanuts all over the whole thing? I was such a hurry when I made this one that I forgot the peanuts before snapping a quick photo. I was literally throwing them onto people’s bowls as they walked out the door (it was a lunch break on a cabinet painting day, good times).

Cabbage Peanut Salad Recipe:
Peanut Dressing:
1/3 cup peanut oil
1/4 cup rice wine vinegar
3 TBSP soy sauce
1/3 cup peanut butter
2 TBSP brown sugar
2 TBSP grated peeled ginger
3 garlic cloves
1 finely minced jalapeno
– Mix all of the liquids in a bowl and set aside. In another bowl, mix together the peanut butter, brown sugar, ginger, garlic cloves and jalapeno. Slowly drizzle in the liquids, whisking constantly to emulsify into a smooth sauce. If your sauce doesn’t look so good, a few hits of an immersion blender should sort it out.
Salad:
1/2 head small green cabbage, thinly sliced
1/2 head small red cabbage, thinly sliced
2 red bell peppers, thinly sliced
2 large carrots, shredded on cheese grater
6 green onions, sliced
1/2 cup packed cilantro, roughly chopped
salt to taste
1/2 cups roasted peanuts
– Toss all of the salad ingredients together with the dressing. Taste for salt adjustment and dig in.
Pine nuts are expensive.
What a week!
Construction on my new business, The Pantry, is moving along, and I can finally see how the space is going to feel when all done. Such a good feeling. Then we released our class schedule on Monday and my “How to be a Pie Ninja” classes sold out in three days! And THEN, as if that wasn’t enough to make me blush, I wake up on Wednesday to the announcement that “I Made That” is a finalist for Saveur Magazine’s Best Cooking Blog award along with 101 Cookbooks, Lottie and Doof, Smitten Kitchen, Sprouted Kitchen and The Wednesday Chef! Seriously, my friends, I am glowing. And a little intimidated…I mean, I knew I had a few readers out there, but I don’t know how I landed in that company. All of a sudden I’m staring intensely at my photos, worried that they just aren’t up to snuff. And what recipe do you post when people are actually LOOKING? I was so scared I actually went out and bought $25 worth of pine nuts, because suddenly walnuts just weren’t good enough! I’m cracking people, I obviously can’t take the pressure. But thank you, whoever nominated me, you are a very nice person. And I mean that.
After a week like that there is only one answer: cake. And, well, I might as well put those pine nuts to good use…
So I toasted them.

And folded them into one of the weirdest cake batters I’ve ever made. It’s from the book “Urban Italian” by Andrew Carmellini, which is a book that I just love. Everything I’ve made from it has been right up my alley, and I’m excited to share this particular recipe. The book has you start with creaming the butter and sugar, and then go straight into adding all of the flour. Once all the flour is in, THEN you start adding the eggs, yogurt and lemon juice. That’s just crazy. But it worked. The cake has a beautiful crumb and it’s not too dense for my taste at all (did I mention it gets meringue folded into it? That probably has something to do with it).

It’s a simple cake, with the texture of a pound cake and a flavor that is almost savory. I made the recipe as he called for, except that I added salt, because all cakes want a little salt. And to be honest, I might add a bit more next time to make it feel even more savory. Or maybe make a salty caramel to pour over it. In fact I might just go do that right now. Certainly all that salt I just added makes it count as dinner rather than dessert, right?

Pine Nut Cake (Pinolata) Recipe (Andrew Carmellini):
cake batter:
2 cups pine nuts
1 1/4 cups sugar
1 pound (4 sticks) butter, at room temperature
zest and juice of 2 lemons
4 cups flour
2 tablespoons baking powder
1 1/2 tsp salt
4 whole eggs
3/4 cup yogurt
for the meringue:
4 large egg whites
1/2 cup sugar
– Preheat the oven to 350 degrees.
– Toast the pine nuts over very low heat in a dry saute pan until they have just begun to take on a golden color. Remove from the stove and reserve. I actually just toasted them in the oven…
– Prepare the batter
– Meanwhile, cream the sugar, butter and lemon zest together in a KitchenAid with the paddle attachment. Be sure to scrape down the sides as you go to make sure everything mixes evenly.
– When the mixture is quite smooth, add the flour and baking powder. Mix until the dry ingredients are just incorporated and then begin adding the eggs, one by one, waiting until each egg is thoroughly mixed in before adding the next. Turn the KitchenAid up to high for about 5 seconds to combine everything thoroughly, then scrape down the sides and the bottom with a spatula and mix in any bits that have failed to incorporate.
– Add the yogurt and mix in with the paddle attachment until it’s thoroughly incorporated.
– As you continue mixing, add the lemon juice and incorporate. Scrape down the sides and bottom and mix well with a spatula. Then transfer the mixture to a large bowl.
– Fold a third of the meringue into the batter using a rubber spatula to combine well. Add the rest of the meringue and fold in well until the mixture is combined. Fold in the pine nuts, reserving about 3 tablespoons for the top of the cakes.
– Brush 2 9×5 loaf pans with melted butter. Fill each loaf pan with the batter. Smooth and flatten the tops with the spatula. Sprinkle the tops of the cakes with the reserved pine nuts. I forgot to do that part. (Now I’ll never win!)
– Bake the loaves on the middle rack until you can put a knife into each and bring it out clean, about 45 minutes.
– Remove the cakes from the oven and let cool in the pans for about 30 minutes and then turn them out onto a cake rack to cool completely.
Homemade Doughnuts! Krispy Kreme style!
Now I’ve really gone and done it. I knew it was a slippery slope, but how could one resist? I’ve made doughnuts before, with mixed success. I’ve probably been the most happy with my apple fritters, but apple fritters are basically in their own category. And ricotta zeppoli, I think I’ve nailed that one. But a perfectly executed, simple glazed doughnut, now that’s a challenge. It seems to me that there are two camps of thought on the topic of glazed doughnuts (we’re talking “raised” doughnuts here), and they revolve around Krispy Kreme: you’re either with them or against them. I know this is a controversial opinion, but having grown up in the South where Krispy Kreme reigns, where staring bug-eyed at those little discs moving along their little frying oil river after church on Sunday mornings was a pinnacle experience, I am a devoted fan. Since moving to the west coast, they are much less ubiquitous, and not having a car for 14 years kept me from seeking them out, which surely kept my waistline in check. All that changes today, because now I can make them myself. Very, very dangerous indeed. I suspect I’ll be renewing my gym membership this week.
For those nervous about doughnuts, let me assure you, they are worth it. While there is a lot of waiting time, the amount of time you’re actually making effort is quite minimal. So while they’re probably not a weeknight dessert (unless your workday ends quite early), they are perfect for a day when you have other things going on in the house. You can check in on them periodically, and once you get the system down, they practically make themselves! OK, not that easy, but you know what I mean.
I started with a very wet and sticky dough.

I let it rise until it doubled in size.

Then I rolled it out and stamped pretty little shapes in it.

I let those pretty rings rise again, until perfectly puffed.

And then I fried them and glazed them. I am very excited about the vanilla glaze. Oh yes. My chocolate glaze, well, it needs some work. And since I need to take a breather from having doughnuts around ALL THE TIME, I will get back to that another day. For now, the glazed doughnut, use it wisely.

GLAZED DOUGHNUTS RECIPE:
(Makes 10 – 12 doughnuts)
2 tsp active dry yeast
1 cup whole milk
12oz bread flour, divided
3 egg yolks
2 TBSP superfine sugar
1/2 tsp salt
1/2 vanilla bean
1/4 tsp vanilla extract
2 oz butter
vegetable oil
– Heat the milk to 100 degrees. I just pop it in the microwave for about 20 seconds. Stir in the yeast until it is dissolved. Transfer to a medium bowl and add 5 1/2 oz of the bread flour. Stir until it forms a smooth paste. Cover the bowl in plastic to prevent drying out and place in a warm spot to rise. The inside of a gas oven is a great place, oven turned off of course.
– When the paste has doubled in size (about an hour, depending on the temperature of your house, it will now look more like a sponge), add it to a kitchenaid mixer fitted with a paddle attachment. Add the egg yolks, superfine sugar and salt and mix on low speed until smooth.
– Split and scrape the seeds from the vanilla bean and add to a small pot with the butter and vanilla extract. Heat just until melted. Add to the dough in the kitchenaid mixer and mix on low speed until smooth. With the mixer running, slowly add the rest of the flour, sprinkling in at the side. Keep mixing until it just comes together into a smooth dough. It will be quite wet and sticky, but should be able to hold together as one “lump” of dough. If not, add a bit more flour, one TBSP at a time.
– Brush a large bowl lightly with vegetable oil. Place the dough in the bowl and cover with plastic wrap. Place in a warm spot to rise.
– Once the dough has doubled in size, pop it in the fridge for 15 minutes. This will make it easier to roll out.
– On a well-floured surface, gently roll out the dough to about 3/8” to 1/2” thickness. Use a cutter to stamp out whatever shapes you like. Place the stamped dough on a parchment lined sheet pan, cover with plastic and allow to rise again in a warm spot.
– Once the doughnuts are almost doubled in size, begin heating 1 1/2 to 2 inches of vegetable oil in a large pot. When the the oil reaches 360º start frying the doughnuts in batches. Fry them until golden brown on each side, the total frying time will be under 2 minutes. Use tongs to flip and retrieve them.
– Allow to drain on a wire rack over a sheet tray. While still warm, drizzle with glaze. If making chocolate doughnuts, wait until they have cooled and then dip half in the chocolate glaze.
Glaze:
1 1/2 cups powdered sugar
1/2 tsp vanilla extract
1/8 tsp salt
1/4 cup milk
– Combine all ingredients in a small bowl and stir until smooth. If it is lumpy, pour it through a fine mesh strainer.
Homemade Pork Buns!
Dear Pork,
We meet again. This time things got intense. As per usual I was dabbling in vegetarianism, reading books like “Animal Factory” and “Eating Animals” and having thoughts like “I just can’t keep eating meat”. Then I bought a groupon for Barnes and Noble. Dammit, I blame it on them. I was perusing the shelves, looking for just the right present to myself (I’ve imposed a cookbook moratorium on myself so this was a big day). Then I saw it. A book I’ve been dreaming about since I read about it online: “Asian Dumplings” by Andrea Nguyen. My Lord, it’s like she wrote a book just for me. I snatched it up and stayed awake that night reading it cover to cover. But I’ve been so busy with my new business that I just didn’t have time to make anything from it for months! But finally, I got a day off. And what did I do? I made pork buns. Sticky, messy, slightly sweet, cracktastic pork buns.
First I marinated you in a magical sauce with all kinds of delicousness: five spice powder, hoisin sauce, honey, soy sauce and much more.

Then I laid you on a rack to go in the oven.

And roasted you until you were all glossy and charred and happy looking.

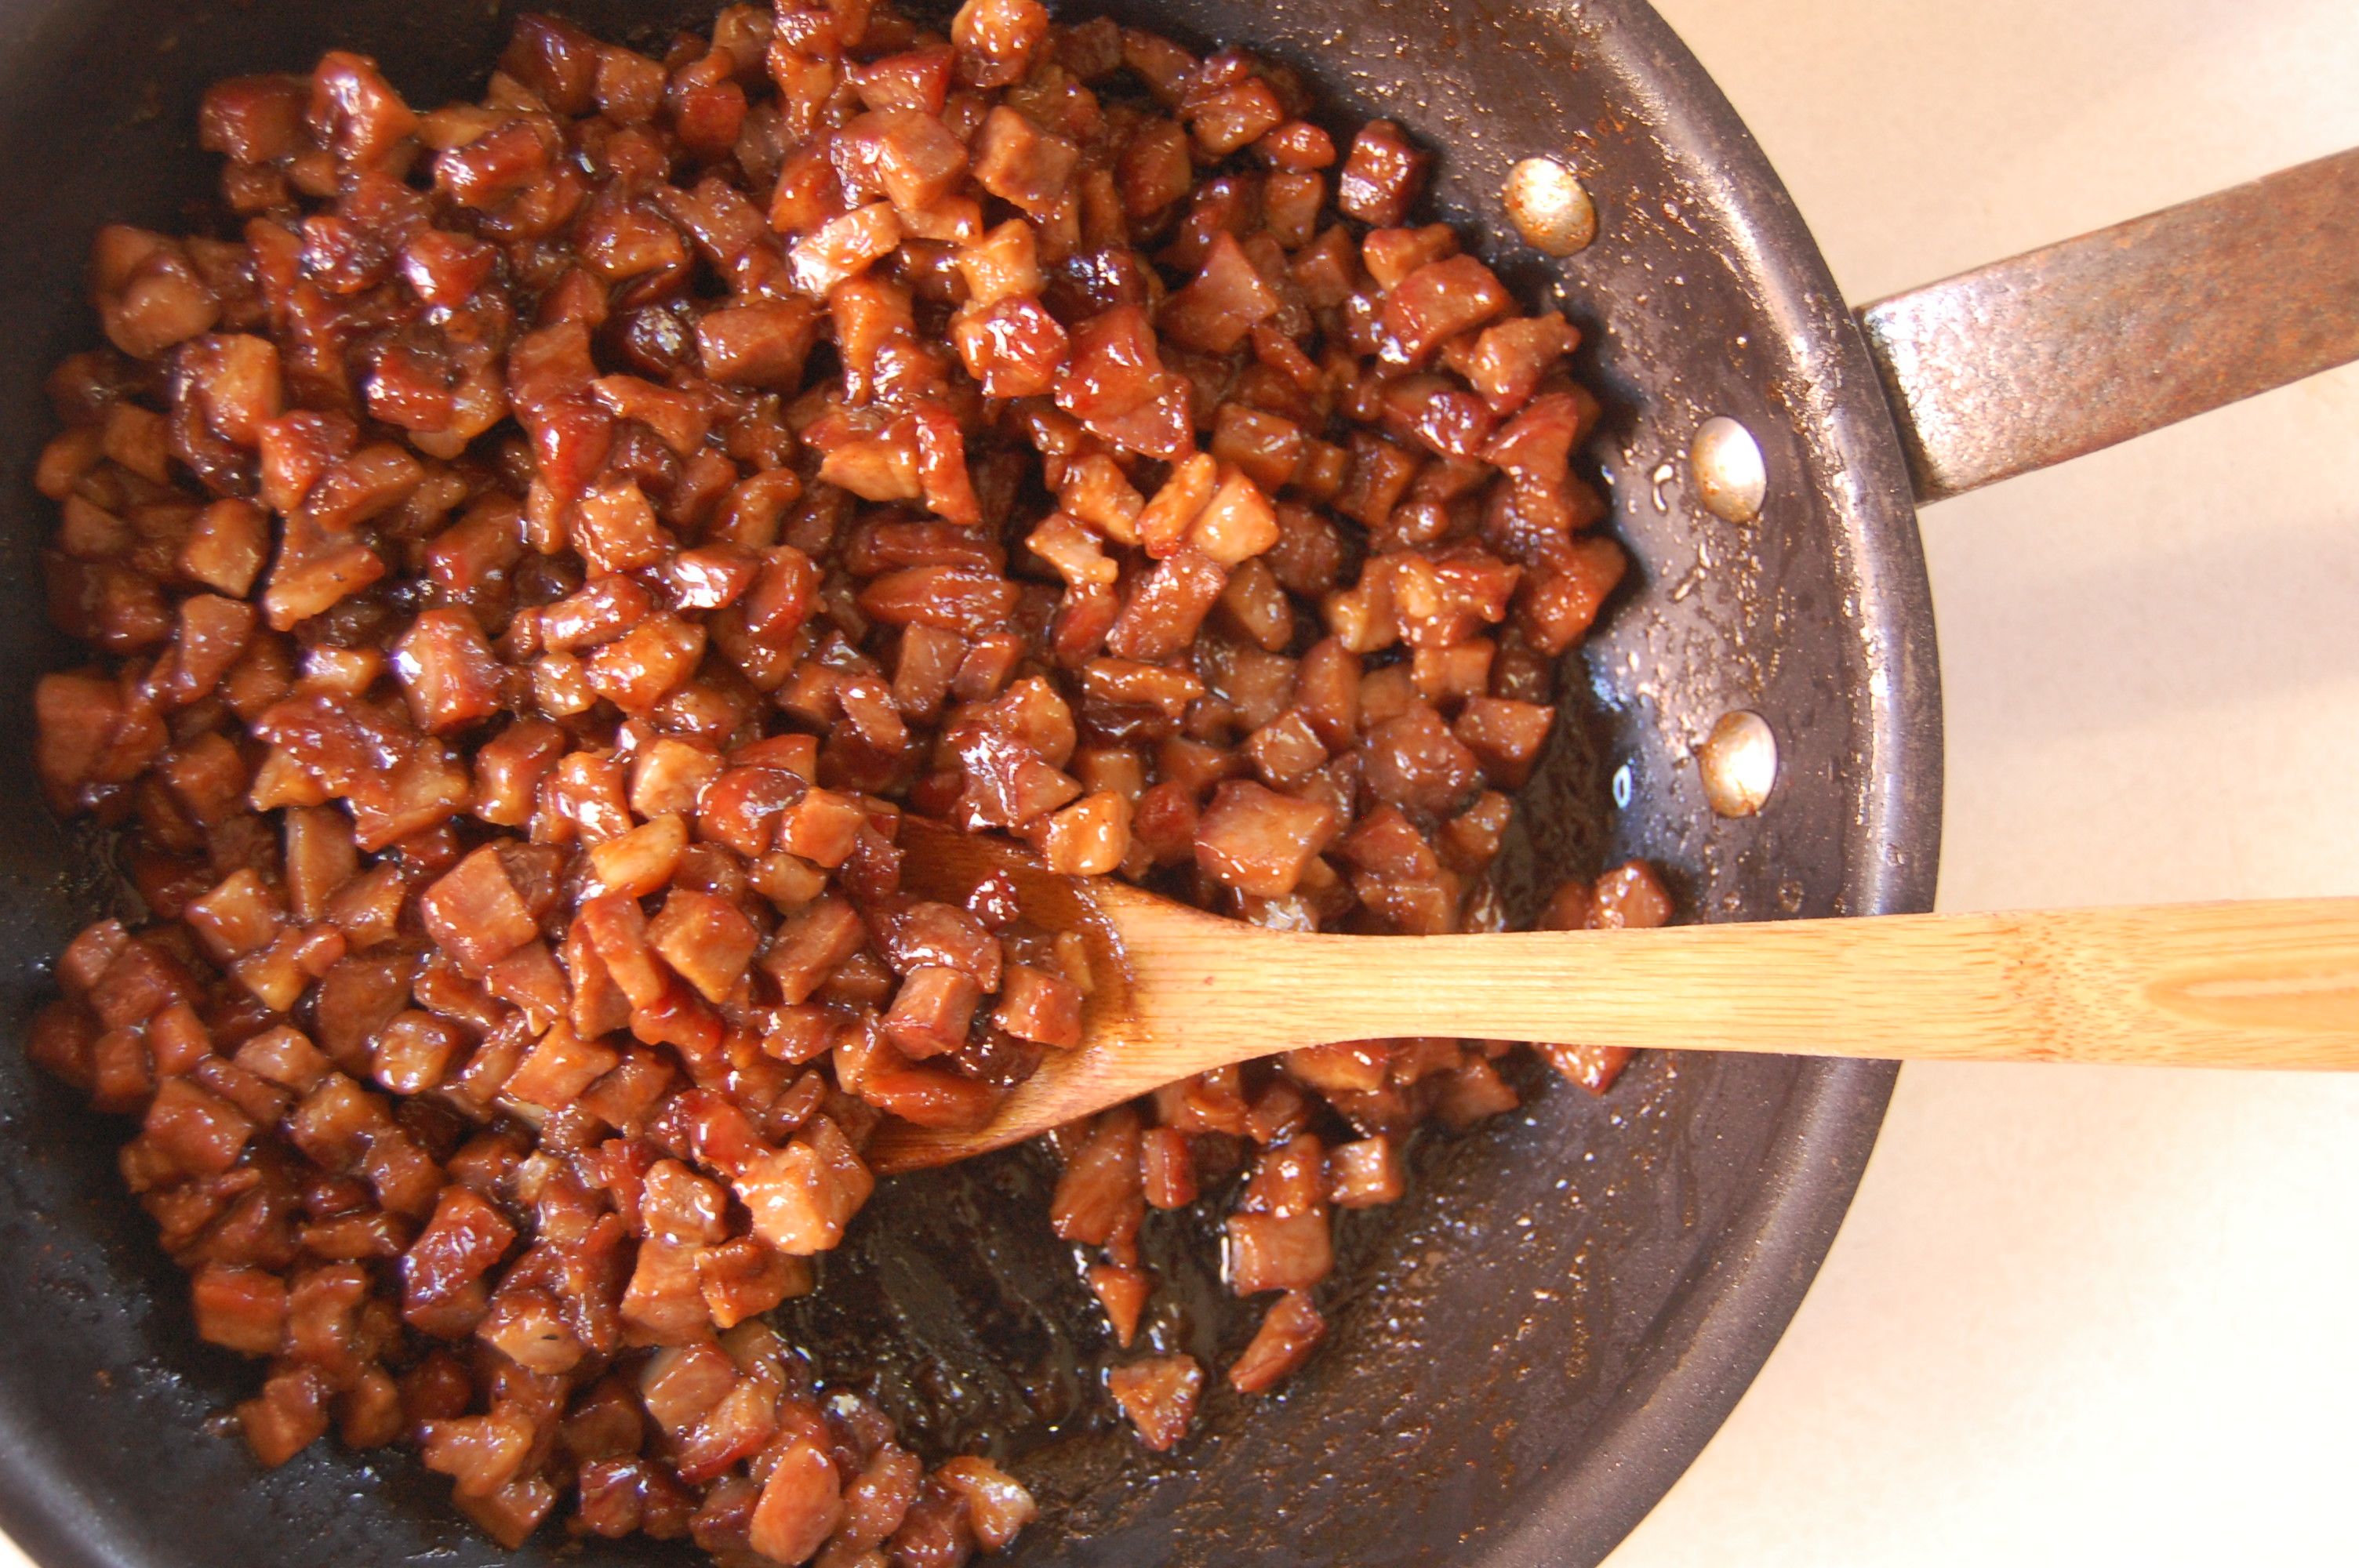
From there I took it a step further. I chopped you up into itty pieces and cooked you with more delicious sauciness.

While you waited patiently, I made a dough, a dough not too different from my favorite hamburger bun dough. I cut that dough into chunks.

And then I encased you in that dough, giggling with every pleat.

You made adorable dumplings.

I let your dough rise until soft, and then I roasted you again. I pulled you from the oven and glazed you with honey. And then me and friends devoured you. Oh my, sweet pork, you do continue to surprise me. Thank you, for setting me straight again.

PORK BUNS RECIPE (Andrea Nguyen):
Char Siu Pork:
1 lb bonelss pork shoulder
1 big clove garlic
1 1/2 TBSP sugar
1/4 + 1/8 tsp five spice powder
2 TBSP 3/4 tsp hoisin sauce
1 1/2 TBSP honey
1 TBSP + 1/2 tsp Shaoxing rice wine
2 1/2 TBSP soy sauce
1 1/2 tsp sesame oil
– Cut the pork into strips that are 1 1/2” thick.
– Mix the rest of the ingredients in a bowl large enough to fit the pork, this will be the marinade. Remove 1/3 of the marinade to a small bowl and store in the fridge. This will be used later on for basting the pork as it roasts. Toss the pork in with the rest of the marinade to coat evenly. Cover and refrigerate for 6-8 hours, turning the pork 2-3 times.
– Remove the pork and reerved marinade from the fridge and let sit at room temperature for 45 minutes. Preheat the oven to 475 degrees. Line a baking sheet with aluminum foil and place a roasting tack on top. Put the prok on the rack, leaving an inch between the pieces for heat circulation. Discard the used marinade.
– Roast for 30 minutes, basting both sides of the pork with the marinade every 10 minutes. Flip the pieces over at every interval. T]he pork is done when it is glazed and slightly charred, Remove from the oven. Let the meat rest for 10 minutes before using.
Pork Bun Filling:
1 TBSP sugar
1 pinch of salt
1 pinch of white pepper
1 TBSP soy sauce
2 tsp oyster sauce
1 TBSP water
2 tsp canola oil
2 scallions (white and green parts), chopped
1/2 pound Char Siu Pork, diced
1 tablespoon Shaoxing rice wine
1 1/2 TBSP cornstarch dissolved in
2 TBSP water
– To make the flavoring sauce, combine the sugar, salt, white pepper, soy sauce, oyster sauce, and water in a small bowl. Stir to dissolve the sugar and set aside.
– Heat the oil in a medium skillet over medium heat. Add the scallions, and cook, stirring constantly, for about 30 seconds, or until aromatic and slightly softened. Add the pork and combine well. Add the flavoring sauce and cook, stirring frequently, for about 2 minutes, or until the pork is heated through. Meanwhile, add the rice wine to the dissolved cornstarch. When the pork is hot enough, add the wine and cornstarch mixture. Cook for another 30 seconds, stirring constantly, until the mixture comes together into a mass that you can mound. Transfer to a bowl and set aside to cool completely before using. (The filling can be prepared up to 2 days in advance, covered with plastic wrap, and refrigerated. Return to room temperature before using.)
Dough:
10 TBSP whole milk
4 TBSP butter
2 tsp rapid-rise (instant) dry yeast
2 1/2 TBSP lukewarm water
1 large egg
2 1/2 TBSP sugar
12 1/2 oz All-purpose flour
1 large egg, lightly beaten
2 TBSP honey mixed with 1 TBSP warm water
– For the dough, melt the butter with the milk in a saucepan over medium heat. Set aside to cool for about 5 minutes, or until warm (about 110°F).
– Put the yeast in small bowl, add the water, and set aside for 1 minute to soften. Whisk in the milk mixture and the egg to blend.
– Combine the sugar and flour in a food processor. Pulse two or three times to blend. With the machine running, pour the yeast mixture through the feed tube in a steady stream. After a sticky mass of very soft dough forms, about 5 seconds, continue processing for 45 to 60 seconds to form a smooth, slightly sticky dough that mostly cleans the bowl. The finished dough should stick a bit to your finger when pressed. Alternatively, to make the dough by hand, combine the sugar and flour in a large bowl. Make a well in the center and pour in the yeast mixture. Slowly stir with a wooden spoon to work in all the flour. (Add water by the teaspoon if this doesn’t happen with relative ease.) Keep stirring as a ragged, soft mass forms. Then use your fingers to gather and pat the dough into a ball. Transfer to a work surface and knead for about 5 minutes, or until smooth, fingertip soft, and slightly elastic. (You should not need any additional flour on the work surface if the dough was properly made. Keep kneading and after the first minute or two, the dough should not stick to your fingers. If it does, work in a sprinkling of flour.) Press your finger into the dough; it should spring back, with a faint indentation remaining.
– Regardless of the mixing method, lightly oil a clean bowl and add the dough. Cover with plastic wrap and put in a warm, draft-free place (for example, the oven with the light on) to rise for about 45 minutes, or until nearly doubled.
– Line 2 baking sheets with parchment paper before beginning to assemble the buns.
– Remove the dough from the bowl and put on a lightly floured surface. Knead it a few times, then cut it in half. Cover one-half with plastic wrap or an inverted bowl to prevent drying. Roll out the dough into a 12-inch log, and then cut it into 8 or 16 pieces for medium or small buns, respectively. (Halve or quarter the log first to make it easier to cut even-size pieces. The tapered end pieces should be cut a little longer than the rest.) Lightly roll each piece between your hands into a ball and then flatten each one into a 1/4-inch-thick disk. Use a wooden dowel-style rolling pin to roll the pieces into circles, about 2 1/2 inches in diameter for small or 31/4 inches in diameter for medium buns. The rim should be thinner than the center; keep a 1-inch-wide belly. The finished circle will rise as it sits. Lay the finished circles out on your work surface, lightly dusting their bottoms with flour if you fear they will stick.
– To form a bun, hold a dough circle in a slightly cupped hand. Use a spoon or fork to center about 2 teaspoons of filling for small buns, or about 4 teaspoons of filling for medium ones, on the dough circle, pressing down very gently and keeping about 1/2 to 3/4 inch of the dough clear on all sides; your hand will automatically close slightly. Use the thumb of the hand cradling the bun to push down the filling while the other hand pulls up the dough edge and pleats and pinches the rim together to form a closed satchel. Pinch and twist the dough closed at the end. Place the bun pleat side down on the prepared baking sheet. Repeat with the remaining dough circles, spacing them 11/2 inches apart on the baking sheet. Loosely cover with plastic wrap or a kitchen towel. Set in a warm, draft- free place (for example, the oven with the light on) for 30 minutes to rise. Meanwhile, work on the other dough half to form more buns.
– To bake the buns, about 10 minutes before the rising time is over, position a rack in the middle of the oven and preheat to 350°F. (Let the buns finish rising at room temperature if you’ve had them in the oven.)
– Bake one baking sheet at a time, brushing the top and side of each bun with the egg right before baking. Bake small buns for about 14 minutes and medium buns for about 18 minutes, or until a rich golden brown; the cooked buns sound hollow when tapped on the bottom. Remove them from the oven, set on a rack, and let cool for 5 minutes.
– Brush the honey mixture on the buns for a sweet-glaze finish that will also soften the crust. Enjoy warm and out of hand. Refrigerate left- over buns for up to a week and reheat at 350°F for 8 to 10 minutes, until hot. When making the buns in advance, wait to brush on the glaze until after you’ve reheated the buns. These buns may also be frozen for up to a month. Thaw them completely before reheating.
Piggy’s Got a New Blanket
Okay, time to own up to another guilty pleasure.
You might remember a certain love letter, to a certain carnitas, written many a month ago. Well, it is carnitas time again. I mean, when is it ever not carnitas time…. We’ve been hard at work on The Pantry, and there’s nothing quite like building your own business with your bare hands to work up an appetite. We’ve been working so hard, in fact, that I invited my most carnivorous friend Scott to Seattle, to help my tiny little muscles. Because in case you didn’t know this, construction, it is physical. After weeks ripping sheet rock from the walls, nailing boards to form our new ceiling, scraping the linoleum off of the floor to find (gasp!) a SECOND layer of linoleum, I found myself with a small bit of time before we start jackhammering (oh yeah, you heard me) the concrete in our future garden. Give me a night off with some of my meat-loving friends, and some porky goodness is sure to show up. Carnitas. That deliciously salty, crispy, sweet, melt in my mouth porkfest was calling. But hold your carnitas, because there’s new tortilla in town.
Here’s the thing. I know you’re supposed to like corn tortillas better, because that’s the “authentic” Mexican way. But guess what? I’m not from Mexico. In fact, being from Alabama, I’m doing good just to have graduated past Taco Bell. So I’m here to admit for the world wide web to hear: I like flour tortillas better. Not the stretchy, gummy kind of steamed flour tortillas you get at a taqueria (oh how I miss you, dear Mission district), but something with some chew to it. Blistered from heat and even a little puffy. I could munch on good flour tortillas daily. The problem? Good flour tortillas are few and far between. As per usual, I thought, why not make my own? So I did. And they were perfection. I now pass the baton to you.

A note about lard: If you don’t have time to make your own, then you should be able to find freshly rendered lard at a good butcher shop. Even if you don’t see it, just ask, because sometimes they keep it hidden away. This time I got my lard from Rainshadow Meats on Capitol Hill.
Flour Tortillas Recipe:
Makes 8 tortillas.
2 cups AP flour
1 tsp baking powder
1 1/4 tsp salt
6 TBSP fresh lard, RT
3/4 cup milk, warm
– Mix together the flour, baking powder and salt. Add the lard and work in you’re your hands until all of the flour is coated.
– Add the warm milk and stir the mixture with a spoon until it forms a dough. Knead for 4 minutes on a floured surface. The dough should be firm and soft.
– Place the dough in a bowl and cover with a damp cloth or plastic wrap for 30 minutes.
– After the dough has rested, roll it into a log. Slice the log into into eight discs. Use your hand to flatten each disc, then place on a plate without touching each other. Cover the dough with a damp cloth or plastic wrap for 10 minutes. After the dough has rested, one at a time place a piece on a floured surface and roll with a rolling pin from the center until it’s thin and about eight inches in diameter. Keep rolled-out tortillas covered until ready to cook.
– In a dry cast iron skillet heated on high, cook the tortilla about thirty seconds on each side. It should start to puff a bit when it’s done. Keep cooked tortillas covered wrapped in a cloth until ready to eat. They can be reheated in a dry iron skillet.
Back to the Basics
Some things are so simple that I hesitate to share. But today, I’ve got a little snack that is making me a very happy girl. It is inspired by a dinner I had at Frankie’s on my last visit to NYC, and I can honestly say that it was the most memorable thing I ate there. The “it” I keep mentioning was a bruschetta, with a giant mound of fresh ricotta on top, drizzled with honey and a healthy shower of black pepper. I was in heaven. Sure, I’ve been known to sing the praises of ricotta to anyone willing to listen, particularly the homemade kind (because let’s face it, most of the stuff you get in a tub at the grocery store tastes like canned air). The truth is, I try to work in fresh ricotta whenever possible: gnocchi, galettes, pasta, cakes, fritters, we’re even serving a ricotta and blood orange dessert at Delancey right now. I LOVE RICOTTA. But even I sometimes have a bowl of delicious fresh ricotta in my fridge and the feeling of “there’s nothing to eat in the house”. I will say this no more, because the “honeyed and peppered ricotta cracker” is my new go-to. Try it, you’ll see what I’m talking about. I made them last night for the Academy Awards and I think I might have eaten 10 while no one was looking.

While the first time I tasted this combo was on bruschetta, I’m now a convert to serving it on crackers. And when I say crackers, I would hope it’s obvious at this point in our relationship that I’m talking about homemade ones. I know it sounds annoying to make your own crackers, especially after I just smacked down store-bought ricotta. But if I can find the time while working at Delancey and starting a new business, then I swear, you can do it too! Did I mention that it’s actually quite soothing? The dough is super easy, and I’ve found that I can make rather large batches in my KitchenAid mixer, freezing for later what I don’t need at the moment. Then whenever I need crackers, it’s as simple as rolling them out and baking them fresh!

I’ve been tweaking this recipe for over a year, getting the balance of flours and salt just so, and I’m feeling pretty good about it. But feel free to adjust to your own personal taste! The sea salt is great with the ricotta and honey topping, but I would never turn down a cracker with seeds and other yumminess. Get crazy, you’ll thank me! My one piece of advice: resist the urge to pull them out too early, this is your chance to get back at all those pasty bland crackers at the store. Color is flavor my friends!
Olive Oil and Sea Salt Crackers Recipe:
Yield: 50 crackers
1 lb AP flour
6.75 oz semolina flour
4.5 oz whole wheat flour
2 1/4 tsp salt
1 3/4 cups warm water
3/4 cup olive oil
extra olive oil and sea salt for topping crackers.
– Whisk together the flours and salt in a stand mixer bowl fitted with a dough hook. Mix the water and olive oil and add to the flours. Mix the dough at medium speed for about 5 – 7 minutes, until smooth. The dough should be just a bit tacky, but not difficult to work with. Add a bit more water or flour if needed.
– When you are done mixing, shape the dough into a large ball and rub with olive oil. Place in a bowl covered with plastic wrap and let sit at room temperature for 1 hour to relax the gluten.
– Preheat your oven to 475 degrees.
– Cut the dough into equal-sized pieces roughly the size of a billiard ball and flatten.
– Using a pasta machine, roll into a flat strip of dough, starting with the widest setting and working your way up to number 5. Lay the sheet of dough on a floured surface and cut into whatever shape you like. Set on a parchment lined baking sheet and brush each cracker heavily with olive oil. Top with sea salt and bake until golden.
– Cool completely.
Ricotta Recipe:
6 1/2 cups whole milk
1 1/2 cups heavy cream
2 cups cultured buttermilk
1 TBSP salt
– Combine everything in a large pot and cook over medium heat. When the mixture forms curds and the whey separates and becomes clear, turn off heat. Let it for 30 minutes for the curds to strengthen.
– Set a strainer over a container and line with 2 layers of cheesecloth. Pour ricotta onto cheesecloth and let strain until a desired consistency is reached.
– Stir in salt.
Happy Birthday Carrot Cake
I will admit that I haven’t spent much time on this post. Things are busy (are you as tired as I am of hearing me say that?), but there’s always time for a birthday cake. (Happy Birthday Katie!) This is a cake recipe I’ve been dying to post, mostly for the selfish reason that I want it available to me online whenever a cake emergency arises. So here you are, with completely unspectacular photos, a spectacular carrot cake. This cake recipe comes from Molly, who I am realizing has quite good taste in cakes. This one might possibly be the most perfect carrot cake. Moist, tender, not at all too sweet as they sometimes are. And a complete cinch to throw together.

For the frosting I tweaked Molly’s recipe a bit, because I wanted something a bit more tart and sour. So being the obvious person that I am, I added sour cream. And lots more lemon juice. This particular cake I made for my friend Katie to take to a dinner, so I didn’t even get to eat a slice. That was hard, and I will probably have to make another one all for myself.

CARROT CAKE WITH LEMONY CREAM CHEESE FROSTING
yield: 1 (8-inch) 3 layer cake
Cake:
2 cups all-purpose flour
2 tsp baking powder
2 tsp baking soda
1 tsp salt
1 tsp ground cinnamon
½ tsp freshly grated nutmeg
¾ tsp ground ginger
1 ½ cups sugar
1 cup vegetable oil
4 large eggs
½ cup unsweetened applesauce
3 cups finely grated peeled carrots
1 cup pecans, chopped
– Position racks in the top and bottom third of the oven, and preheat to 325°F. Lightly grease 3 (8-inch) round pans with butter. Line the bottom of the pans with parchment paper.
– In a medium bowl, combine the flour, baking powder, baking soda, salt, cinnamon, nutmeg, and ginger. Whisk well to blend.
– In the bowl of a stand mixer, beat the sugar and oil until combined. Add the eggs one at a time, beating well to incorporate after each addition. Add the applesauce, beating to mix. Add the flour mixture, and beat to incorporate, scraping down the sides of the bowl with a rubber spatula if needed. Add the carrots and the pecans, and beat briefly.
– Divide the batter evenly between the prepared pans. Slide the pans into the oven and bake until the cakes begin to pull away from the sides of the pan and a toothpick inserted into the center comes out clean, about 35-45 minutes. Cool the cakes in their pans on a wire rack for 15 minutes; then turn them out onto the rack to cool completely.
Cream Cheese Frosting:
1 lb cream cheese, RT
5oz butter, RT
1 cup sour cream
2 cups powdered sugar
1 tsp vanilla extract
1 TBSP lemon juice
1/8 tsp salt
– In the bowl of a stand mixer, beat the butter and cream cheese on medium speed until smooth. Sift in the powdered sugar, and beat on low speed until incorporated. Add the sour cream, vanilla, lemon juice and salt, and beat well to incorporate. If the frosting is lumpy from the sugar, bump the speed up to medium-high and beat the crap out of it.
In case you haven’t already met: The Crack Pie
So January was kind of a big month for me.
Construction for my new business, The Pantry, is in full swing. We’ve got all of the walls and ceiling ripped out of our space, and now begins the moment of building rather than destroying. We have a beautiful landscape plan (dreamed up by the talented crew at Fresh Digs), 3 sore backs’ worth of scavenged garden pavers, and lots of beautiful edibles in our future. We just launched our brand new website (check it out!), courtesy of the fantastic Wandering Works Design Co., as well as our first bit of press in Seattle Magazine. I am positively giddy. And if that weren’t enough, last week me and John took a trip to NYC, where we first met 8 years ago, and got ourselves engaged. Wow. Talk about a fun year ahead!
So to celebrate good times, as well as my trip to Momofuku Milk Bar on my first day as a fiancée, I give you the Crack Pie. If you haven’t heard of the Crack Pie, I am so happy to be the first to introduce you. Possibly the most famous slice of pie in Manhattan right now, it is a force to be reckoned with. It’s sweet. It’s salty. It’s oaty. Dare I say it’s over the top. It was exactly what was called for last night.
The crust. The crust is so much fun. It starts with a pretty straightforward oatmeal cookie dough. You press it into a sheet pan until it’s pretty thin. I actually found it a bit sticky to work with and ended up rolling it between parchment sheets.

You bake it until you have one gigantic golden brown oatmeal cookie.

Then you break it into crumbs and toss it with butter and brown sugar, to form an oat cookie pie dough.

That gets pressed into a pie pan, really tightly to prevent leaks.

Then the filling is poured in and the whole thing goes in the oven to set.

And Oh. My. It is insane. Kind of like pecan pie, without those pesky pecans. Wrapped in a crunchy oatmeal cookie. I will admit now that I made two. Friends came over last night and helped me devour the first pie. The second, well I’m regretting that one. It’s just too much crack for this little one. I suspect some staff at Delancey will be finishing it off if John doesn’t read this and hide it before I get there.

CRACK PIE RECIPE (Christina Tosi, Momofuku Milk Bar):
Oat Cookie Crust
Nonstick vegetable oil spray
4 1/2 oz unsalted butter, room temperature, divided
5 1/2 TBSP (packed) golden brown sugar, divided
2 TBSP sugar
1 large egg
3/4 cup plus 2 TBSP old-fashioned oats
1/2 cup all purpose flour
1/8 teaspoon baking powder
1/8 teaspoon baking soda
1/4 tsp (generous) salt
– Preheat oven to 350°F. Line 13x9x2-inch metal baking pan with parchment paper; coat with nonstick spray. Combine 6 TBSP butter, 1/4 cup brown sugar, and 2 TBSP sugar in medium bowl. Using electric mixer, beat mixture until light and fluffy, occasionally scraping down sides of bowl, about 2 minutes. Add egg; beat until pale and fluffy. Add oats, flour, baking powder, baking soda, and salt and beat until well blended, about 1 minute. Turn oat mixture out onto prepared baking pan; press out evenly to edges of pan. Bake until light golden on top, 17 to 18 minutes. Transfer baking pan to rack and cool cookie completely.
– Using hands, crumble oat cookie into large bowl; add 3 TBSP butter and 1 1/2 TBSP brown sugar. Rub in with fingertips until mixture is moist enough to stick together. Transfer cookie crust mixture to 9-inch-diameter glass pie dish. Using fingers, press mixture evenly onto bottom and up sides of pie dish. Place pie dish with crust on rimmed baking sheet.
Filling
3/4 cup sugar
1/2 cup (packed) golden brown sugar
1 TBSP nonfat dry milk powder
1/4 tsp salt
4 oz unsalted butter, melted, cooled slightly
6 1/2 TBSP heavy whipping cream
4 large egg yolks
1 teaspoon vanilla extract
Powdered sugar (for dusting)
– Position rack in center of oven and preheat to 350°F. Whisk both sugars, milk powder, and salt in medium bowl to blend. Add melted butter and whisk until blended. Add cream, then egg yolks and vanilla and whisk until well blended. Pour filling into crust. Bake pie 30 minutes (filling may begin to bubble). Reduce oven temperature to 325°F. Continue to bake pie until filling is brown in spots and set around edges but center still moves slightly when pie dish is gently shaken, about 10 minutes longer. Cool pie 2 hours in pie dish on rack. Chill uncovered overnight.
– Sift powdered sugar lightly over top of pie. Cut pie into wedges and serve cold.
Oatmeal Creme Pies!
First, let me apologize for my absence. December was rough. Fun, but rough. But January is here and I am finally back in the kitchen.
Now, to business.
When I was itty bitty and carried a lunchbox to school, my mom used to pack it full of yumminess. Well, at the time I thought it was yummy. Though I remember being jealous of my friend Leia’s lunch, because she always had more homemade-type things. Years later she told me she was always jealous of my lunch because I had Little Debbie snacks. Today we both win! I’ve been wanting to recreate these cookies for years, but have been lacking what I thought was a great oatmeal cookie recipe. I wanted a thin cookie, one that was chewy enough to hold a soft fluffy filling. After some tweaking, I feel confident in saying that I’ve got it. In this batch I chopped up dates into my dough, but next time I’m thinking currants, because those dates are just too sweet for me!

I scooped the dough into little balls.

And smashed them down with the back of a wet spoon (wet is important if you don’t want them to stick). This might seem like a meaningless step, but it makes the cookies spread nice and thin.

While they were baking, I got to work on the filling. I first tried making a simple vanilla fluff, much like the original. My friend Olaiya happened to swing by at the exact moment I finished and confirmed for me that to make these little guys palatable to adults, I needed some acid. So I decided to go with a lemony filling, to balance out the sweetness of the cookie. I ground lemon zest and half of a vanilla bean into sugar in the food processor until it was nice and crumbly.

I mixed the lemon sugar with egg whites and heated the whole thing up before whipping it into a swiss meringue. Into the meringue I folded in some lemon juice. And then I hid it until the cookies were all ready for sandwiching, because nobody needs a giant batch of fluff within reach.

Once my cookies were cooled, I started stacking. It took me a few hours before I was ready to munch on them, because all the snacking during the testing phase kind of blew me out. When it was time though, oh boy was I happy. Little Debbie, you have been one-upped.

OATMEAL COOKIE RECIPE:
8 oz butter, RT
1 cup brown sugar
3/4 cup sugar
2 eggs, RT
1 egg white, RT
1 tsp vanilla extract
1 1/4 cup AP flour
3/4 tsp salt
1/2 tsp baking soda
1/4 tsp cinnamon
3 cups oats
6 oz chopped dates
– Preheat oven to 350 degrees.
– Whisk together flour, salt, baking soda and cinnamon. Add the chopped dates and rub to break up clumps. Add the oats. Set aside.
– Cream butter for 1 minute.
– Add the sugars and cream for 3 minutes.
– Add the egg and vanilla and cream for 2 minutes.
– Add the dry ingredients.
– Scoop onto a parchment lined sheet pan. Press flat with a wet spoon.
– Bake for 11 minutes.
LEMON FLUFF RECIPE:
6 oz egg whites
12 oz sugar
zest of 1 lemon
2 tsp lemon juice
– Combine sugar and lemon zest in food processor. Process for 1 minute.
– Combine with egg whites in a kitchen aid bowl. Whisk well.
– Heat over a water bath, whisking constantly until the egg whites reach 160 degrees.
– Remove from water bath and whip for several minutes, until cool and fluffy.
– Whisk in lemon juice.


22 comments